https://toreaurstad.blogspot.com/2024/12/azure-ai-openai-chat-gpt-4-client.html
This code will use Open AI Chat GPT-4 together with additional data source. I have tested this using Storage account in Azure which contains blobs with documents. First off, create Azure AI services if you do not have this yet.

Then create an Azure AI Search

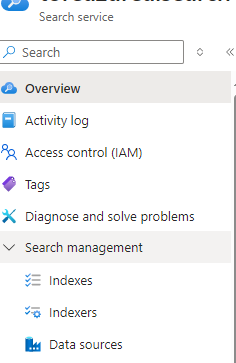
Choose the location and the Pricing Tier. You can choose the Free (F) pricing tier to test out the Azure AI Search. The standard pricing tier comes in at about 250 USD per month, so a word of caution here as billing might incur if you do not choose the Free tier. Head over to the Azure AI Search service after it is crated and note inside the Overview the Url. Expand the Search management and choose the folowing menu options and fill out them in this order:
- Data sources
- Indexes
- Indexers

There are several types of data sources you can add.
- Azure Blog Storage
- Azure Data Lake Storage Gen2
- Azure Cosmos DB
- Azure SQL Database
- Azure Table Storage
- Fabric OneLake files
Upload files to the blob container
- I have tested out adding a data source using Azure Blob Storage. I had to create a new storage account and I believe Azure might have changed it over the years, so for best compability, add a brand new storage account. Then choose a blob container inside the Blob storage, then hit the Create button.
- Head over to your Storage browser inside your storage account, then choose Blob container. You can add a Blob container and then after it is created, click the Upload button.
- You can then upload multiple files into the blob container (it is like a folder, which saves your files as blobs).
Setting up the index
- After the Blob storage (storage account) is added to the data source, choose the Indexes menu button inside Azure AI search. Click Add index.
- After the index is added, choose the button Add field
- Add a field name called : Edit.String of type Edm.String.
- Click the checkbox for Retrievable and Searchable. Click the button Save
Setting up the indexer
- Choose to add an Indexer via button Add indexer
- Choose the Index you added
- Choose the Data source you added
- Select the indexed extensions and specify which file types to index. Probably you should select text based files here, such as .md and .markdown files and even some binary file type such as .pdf and .docx can be selected here
- Data to extract: Choose Content and metadata
Source code for this article
The source code can be cloned from this Github repo:br /> https://github.com/toreaurstadboss/OpenAIDemo.git
The code for this article is available in the branch:
feature/openai-search-documentsources To add the data source to our ChatClient instance, we do the following. Please note that this method will be changed in the Azure AI SDK in the future :
            ChatCompletionOptions? chatCompletionOptions = null;
            if (dataSources?.Any() == true)
            {
                chatCompletionOptions = new ChatCompletionOptions();

                foreach (var dataSource in dataSources!)
                {
#pragma warning disable AOAI001 // Type is for evaluation purposes only and is subject to change or removal in future updates. Suppress this diagnostic to proceed.
                    chatCompletionOptions.AddDataSource(new AzureSearchChatDataSource()
                    {
                        Endpoint = new Uri(dataSource.endpoint),
                        IndexName = dataSource.indexname,
                        Authentication = DataSourceAuthentication.FromApiKey(dataSource.authentication)
                    });
#pragma warning restore AOAI001 // Type is for evaluation purposes only and is subject to change or removal in future updates. Suppress this diagnostic to proceed.
                }

            }
The updated version of the extension class of OpenAI.Chat.ChatClient then looks like this: ChatClientExtensions.cs
using Azure.AI.OpenAI.Chat;
using OpenAI.Chat;
using System.ClientModel;
using System.Text;

namespace ToreAurstadIT.OpenAIDemo
{
    public static class ChatclientExtensions
    {

        /// <summary>
        /// Provides a stream result from the Chatclient service using AzureAI services.
        /// </summary>
        /// <param name="chatClient">ChatClient instance</param>
        /// <param name="message">The message to send and communicate to the ai-model</param>
        /// <returns>Streamed chat reply / result. Consume using 'await foreach'</returns>
        public static AsyncCollectionResult<StreamingChatCompletionUpdate> GetStreamedReplyAsync(this ChatClient chatClient, string message,
            (string endpoint, string indexname, string authentication)[]? dataSources = null)
        {
            ChatCompletionOptions? chatCompletionOptions = null;
            if (dataSources?.Any() == true)
            {
                chatCompletionOptions = new ChatCompletionOptions();

                foreach (var dataSource in dataSources!)
                {
#pragma warning disable AOAI001 // Type is for evaluation purposes only and is subject to change or removal in future updates. Suppress this diagnostic to proceed.
                    chatCompletionOptions.AddDataSource(new AzureSearchChatDataSource()
                    {
                        Endpoint = new Uri(dataSource.endpoint),
                        IndexName = dataSource.indexname,
                        Authentication = DataSourceAuthentication.FromApiKey(dataSource.authentication)
                    });
#pragma warning restore AOAI001 // Type is for evaluation purposes only and is subject to change or removal in future updates. Suppress this diagnostic to proceed.
                }

            }

            return chatClient.CompleteChatStreamingAsync(
                [new SystemChatMessage("You are an helpful, wonderful AI assistant"), new UserChatMessage(message)], chatCompletionOptions);
        }

        public static async Task<string> GetStreamedReplyStringAsync(this ChatClient chatClient, string message, (string endpoint, string indexname, string authentication)[]? dataSources = null, bool outputToConsole = false)
        {
            var sb = new StringBuilder();
            await foreach (var update in GetStreamedReplyAsync(chatClient, message, dataSources))
            {
                foreach (var textReply in update.ContentUpdate.Select(cu => cu.Text))
                {
                    sb.Append(textReply);
                    if (outputToConsole)
                    {
                        Console.Write(textReply);
                    }
                }
            }
            return sb.ToString();
        }

    }
}
The updated code for the demo app then looks like this, I chose to just use tuples here for the endpoint, index name and api key:
ChatpGptDemo.cs
using OpenAI.Chat;
using OpenAIDemo;
using System.Diagnostics;

namespace ToreAurstadIT.OpenAIDemo
{
    public class ChatGptDemo
    {

        public async Task<string?> RunChatGptQuery(ChatClient? chatClient, string msg)
        {
            if (chatClient == null)
            {
                Console.WriteLine("Sorry, the demo failed. The chatClient did not initialize propertly.");
                return null;
            }

            Console.WriteLine("Searching ... Please wait..");

            var stopWatch = Stopwatch.StartNew();

            var chatDataSources = new[]{
                (
                    SearchEndPoint: Environment.GetEnvironmentVariable("AZURE_SEARCH_AI_ENDPOINT", EnvironmentVariableTarget.User) ?? "N/A",
                    SearchIndexName: Environment.GetEnvironmentVariable("AZURE_SEARCH_AI_INDEXNAME", EnvironmentVariableTarget.User) ?? "N/A",
                    SearchApiKey: Environment.GetEnvironmentVariable("AZURE_SEARCH_AI_APIKEY", EnvironmentVariableTarget.User) ?? "N/A"
                )
            };

            string reply = "";

            try
            {

                reply = await chatClient.GetStreamedReplyStringAsync(msg, dataSources: chatDataSources, outputToConsole: true);
            }
            catch (Exception ex)
            {
                Console.WriteLine(ex.Message);
            }

            Console.WriteLine($"The operation took: {stopWatch.ElapsedMilliseconds} ms");


            Console.WriteLine();

            return reply;
        }

    }
}
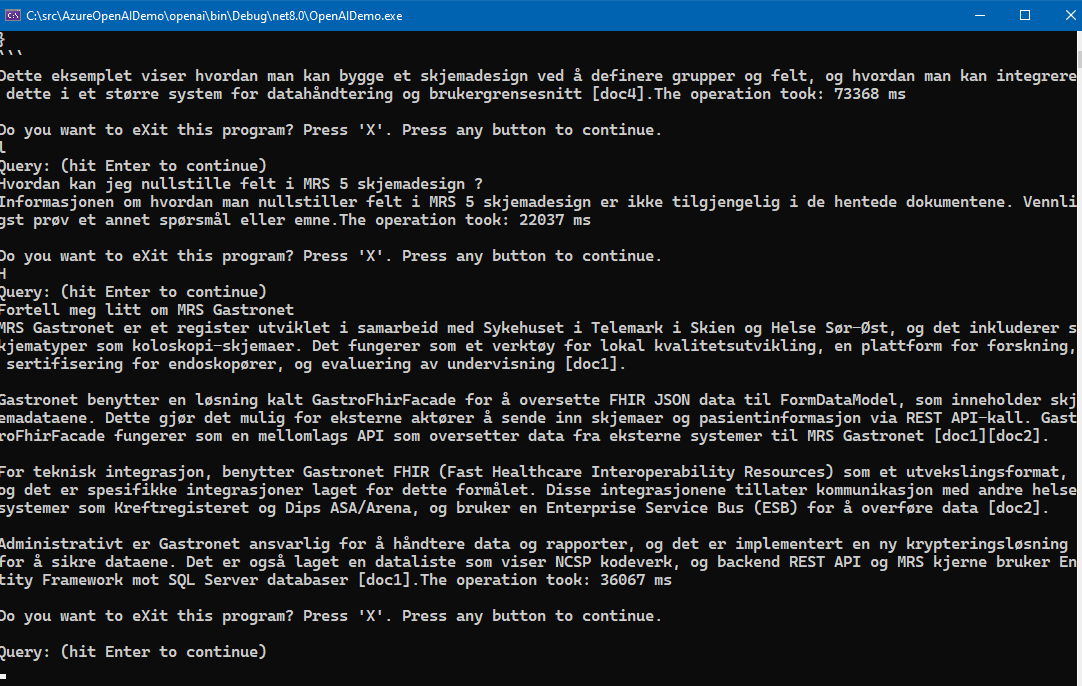
The code here expects that three user-specific environment variables exists. Please note that the API key can be found under the menu item Keys in Azure AI Search. There are two admin keys and multiple query keys. To distribute keys to other users, you of course share the API query key, not the admin key(s). The screenshot below shows the demo. It is a console application, it could be web application or other client :
 Please note that the Free tier of Azure AI Search is rather slow and seems to only allow queryes at a certain interval, it will suffice to just test it out. To really test it out in for example an Intranet scenario, the standard tier Azure AI search service is recommended, at about 250 USD per month as noted.
No comments:
Post a Comment