CLR events so you can build reactive applications where the source pushes updates to its target / receiver instead of traditional pull based scenario of event subscriptions. First off, we install Linqpad from: https://www.linqpad.net I used Linqpad 5 for this code, you can of course download Linqpad 6 with .Net core support, but this article is tailored for Linpad 5 and .NET Framework. After installing Linqpad 5, start it and hit F4. Choose Add Nuget. Now choose Search online and type the following four nuget packages to get started with Reactive extensions for .NET.
- System.Reactive
- System.Reactive.Core
- System.Reactive.Interfaces
- System.Reactive.Linq
- System.Reactive
- System.Reactive.Linq
- System.Windows.Forms
void Main()
{
	var form = new Form();
	form.Width = 800;
	form.Height = 800;
	form.BackColor = Color.White;

	var canvas = new PictureBox();
	canvas.Height = 400;
	canvas.Width = 400;
	canvas.BackColor = Color.AliceBlue;
	form.Controls.Add(canvas);
    .. //more code soon
Next up we create a list of Point to add the points to. We also use Observable.FromEventPattern to track events using the System.Reactive method to create an observable from a CLR event.
We then subscribe to the three events we have set up with observables and add the logic to draw anti-aliased Bezier curves. Actually, drawing a Bezier curve usually consists of the end user defining
four control points, the start and end of the bezier line and two control points (for the simplest Bezier curve). However, I chose anti-aliased Bezier curves that just uses the last four points from the
dragged line, since smooth Bezier curves looks way better than using DrawLine for example for simple polylines. I use GDI CreateGraphics() method of the Picturebox (this is also available on most other Windows Forms controls,
including Forms, but I wanted to have the drawing restricted to the PictureBox).
The full code then is the entire code snippet below:
 void Main()
{
	var form = new Form { Width = 800, Height = 800, BackColor = Color.White };
	var canvas = new PictureBox { Height = 400, Width = 400, BackColor = Color.AliceBlue };
	form.Controls.Add(canvas);
    var points = new List<Point>();
	bool isDrag = false;
	var mouseDowns = Observable.FromEventPattern<MouseEventArgs>(canvas, "MouseDown");
	var mouseUps = Observable.FromEventPattern<MouseEventArgs>(canvas, "MouseUp");
	var mouseMoves = Observable.FromEventPattern<MouseEventArgs>(canvas, "MouseMove");
	mouseDowns.Subscribe(m =>
	{
		if (m.EventArgs.Button == MouseButtons.Right)
		{
			isDrag = false;
			points.Clear();
			canvas.CreateGraphics().Clear(Color.AliceBlue);
			return;
		}
	 isDrag = true;
	});
	mouseUps.Subscribe(m => {
		isDrag = false;
	});
	mouseMoves.Subscribe(move =>  {
	 points.Add(new Point(move.EventArgs.Location.X, move.EventArgs.Location.Y));
	 if (isDrag && points.Count > 4) {
			//form.CreateGraphics().DrawLine(new Pen(Color.Blue, 10), points[points.Count - 2].X, points[points.Count - 2].Y, points[points.Count - 1].X, points[points.Count - 1].Y);
			var pt1 = new PointF(points[points.Count - 4].X, points[points.Count - 4].Y);
			var pt2 = new PointF(points[points.Count - 3].X, points[points.Count - 3].Y);
			var pt3 = new PointF(points[points.Count - 2].X, points[points.Count - 2].Y);
			var pt4 = new PointF(points[points.Count - 1].X, points[points.Count - 1].Y);
			var graphics = canvas.CreateGraphics();
			graphics.SmoothingMode = System.Drawing.Drawing2D.SmoothingMode.AntiAlias;
			graphics.DrawBezier(new Pen(Color.Blue, 4.0f), pt1, pt2, pt3, pt4);
		}
	});
	form.Show();
}
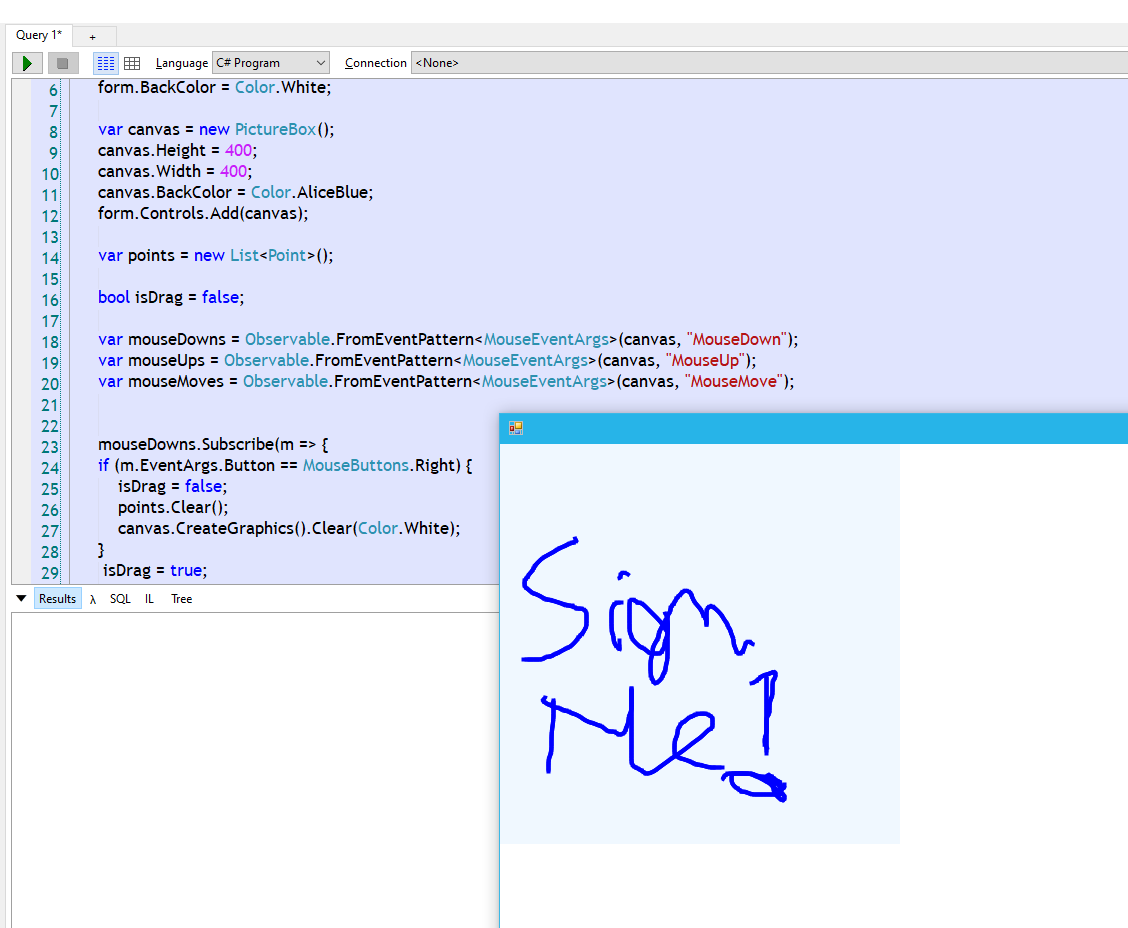
Linqpad/System.Reactive/GDI Windows Forms in action ! Screenshot:
I have added comments here for defining a polyline also instead of Bezier, since this also works and is quicker than the nicer Bezier curve. Maybe you want to display this on a simple device with less processing power etc.
To clear the line, just hit right click button. To start drawing, just left click and drag and let go again.
Now look how easy this code really is to create a simple Ink control in Windows Forms ! Of course Windows Forms today are more and more "dated" compared to younger frameworks, but it still does its job. WPF got its own built-in InkControl.
But in case you want an Ink control in Windows Forms, this is an easy way of creating one and also a good Hello World to Reactive extensions.
In .NET Core, the code should be really similar to the code above. Windows Forms is available with .NET Core 3.0 or newer.
https://devblogs.microsoft.com/dotnet/windows-forms-designer-for-net-core-released/