Friday, 27 December 2024

Terminating a process running on local port using Powershell

Developers who work with frontend and backend often switching between tools get a message that a certain process is holding a port. For example, using the dotnet command, you can get a message that the address is already in use. Note - you usually must decide if you really want to terminate the process running on a certain port, but if you are sure that you just want to close the process and free up the local port for its use, it would be nice to have a way of
just closing the process running on that local port. A typical output would be:

 System.IO.IOException: Failed to bind to address http://127.0.0.1:5000: address already in use.

We can locate which process is using te port, that is, the local port, and then terminate the process. This will free up the local port so we can use it. Here is a Powershell function that will find the process running at a local port, if any, given by a specied port number.


<#
.SYNOPSIS
Stops the process using the specified local port 

.DESCRIPTION
This function finds the process, if any, using the specified port and stops it.
In case there are no process, the function exits.

.PARAMETER portId
The port number to check for the process

.RETURNS int
If successful, returns 0. If not, returns -1.

.EXAMPLE
Terminate-Port -portId 5000
#>
function Terminate-Port {
    param (
        [Parameter(Mandatory = $true)]
        [int]$portId
    )

    # Get the process ID (PID) using the specified port 
    try {
        Write-Host "Looking for processing running using local port: $portId"
        $connection = Get-NetTCPConnection -LocalPort $portId -ErrorAction Stop
        if ($connection) {
            Write-Output "Port $portId is in use by process ID $($connection.OwningProcess | Select-Object -Unique)."
        } else {
            Write-Output "Port $portId is not in use."
            return 0 | Out-Null
        }
    } catch {
        Write-Output "An error occurred: $_"
        return -1 | Out-Null
    }

    $processId = $connection.OwningProcess

    if ($processId -and $processId -gt 0) {
        $process = Get-Process -Id $processId
        if ($process) {
            # Stop the process
            try {
                Stop-Process -Id $processId -Force
                Write-Host "Process running at port $portId was terminated."
                return 0 | Out-Null
            } catch {
                Write-Host "Could not stop process. Reason: $error"
            }
        }
    }

    Write-Host "No process found using port $portId."
    return -1 | Out-Null
}


To terminate , we just run the command

 Terminate-Port -portId 5000


Screenshots of the function being run: BEFORE the command Terminate-Port is run and AFTER. Note that the process running at the given portId was terminated and then the local port is freed up again.
AFTER

Monday, 23 December 2024

Custom spans in C#

This article will look more into Spans in C# and demonstrate how you can create a custom Span yourself.

Span<T> and ReadOnlySpan<T> were introduced in 2018 with C# 7.2 and .NET Core 2.1.

These types provide a way to work with contiguous regions of memory safely and efficiently, without copying data.

They are particularly useful for performance-critical applications, as they allow for slicing and accessing memory without the overhead of array bounds checking.

The introduction of spans marked a significant improvement in how .NET handles memory, offering developers more control and flexibility.

I have added a Github repo for the code shown in this article here:
https://github.com/toreaurstadboss/CustomSpan

ref struct and provide methods for supplying either a reference to an object or in more usual case, an arry. Inside the ref struct, with two fields :

    private readonly ref T _reference;
    private readonly int _length;

To provide support for passing in an array and a start index and length in the constructor of the ref struct


public CustomSpan(T[] array, int start, int length)
{
    ArgumentNullException.ThrowIfNull(array);
    if (!typeof(T).IsValueType && array.GetType() != typeof(T[]))
    {
        // Covariance guard
        throw new ArgumentException($"Covariance between types {typeof(T).FullName} and {array.GetType().FullName} is not supported in CustomSpan");
    }

#if TARGET_64BIT
    if ((ulong)(uint)start + (ulong)(uint)length > (ulong)(uint)array.Length)
    {
        throw new IndexOutOfRangeException("The index was out of bounds for the array");
    }
#else
    if ((uint)start + (uint)length > (uint)array.Length)
    {
        throw new IndexOutOfRangeException("The index was out of bounds for the array");
    }
#endif

    _reference = ref Unsafe.Add(ref MemoryMarshal.GetArrayDataReference(array), (nint)(uint)start); //nint - native integer
    _length = length;
}


MemoryMarshal class inside System.Runtime.InteropServices contains helper methods such as GetArrayDataReference, which returns a reference to the 0-th element of an array. As we can see, array variance checks are done in the method. The Unsafe class inside System.Runtime.CompilerServices provides a method Add which is used to add an element offset to a reference, handy for getting the offset. As we see, there are no copying of memory blocks, only a reference to the first element of the array and start, the offset. The length variable specified here just defines the length to use for bounds checking. Note that we must handle also if the code executes inside 32-bits and 64-bits environments. We finally return a reference to the array given by an offset provided the value start. The (nint) used here is native integer. We also want to provide an indexer, so we can retrieve a value directly. We also provide a writable indexer too, in the method GetWritable. This is not considered good practice regarding encapsulation, just to demonstrate how you could do it.


// Read-only indexer
public ref readonly T this[int index]
{
    get
    {
        if ((uint)index >= (uint)_length)
        {
            throw new IndexOutOfRangeException();
        }
        return ref Unsafe.Add(ref _reference, index);
    }
}

// Read-write indexer
public ref T GetWritable(int index)
{
    if ((uint)index >= (uint)_length)
    {
        throw new IndexOutOfRangeException();
    }
    return ref Unsafe.Add(ref _reference, index);
}


We also provide a method that returns a readonly span from the custom span.


    public ReadOnlySpan<T> AsReadOnlySpan()
    {
        return MemoryMarshal.CreateReadOnlySpan(ref _reference, _length);
    }

To use this CustomSpan, demo code is shown below:


void Main(){

    var nums = Enumerable.Range(0, 1000).ToArray(); 
    var spanOfNums = new CustomSpan<int>(nums, 500, 500); 
    var twentyToFifty = spanOfNums.Slice(20, 5);
    
    Console.WriteLine("Output of the twentytoFifty span:");
    twentyToFifty.PrintArrayContents(); //prints 520..525


    for (int i = 0; i < twentyToFifty.Length; i++)
    {
        twentyToFifty.GetWritable(i) = (int) Math.Pow((double)twentyToFifty[i], 2); //mutates the Span contents - squares the elements , using GetWritable
    }
    
    Console.WriteLine("\nOutput of the mutated twentytoFifty span:");
    twentyToFifty.PrintArrayContents();
}


The output looks like this:


Output of the twentytoFifty span:
520
521
522
523
524

Output of the mutated twentytoFifty span:
270400
271441
272484
273529
274576


Usually, you would use the built-in spans in C#, as they contain the necessary functionality you need. This article was just a dive into how Spans are implemented, the code for Spans are available on the .NET source code web site :

https://source.dot.net https://source.dot.net/#System.Private.CoreLib/src/libraries/System.Private.CoreLib/src/System/Span.cs,d2517139cac388e8

Monday, 16 December 2024

SpeechService in Azure AI Text to Speech

This article will present Azure AI Text To Speech service. The code for this article is available to clone from Github repo here:

https://github.com/toreaurstadboss/SpeechSynthesis.git

The speech service uses AI trained speech to provide natural speech and ease of use. You can just provide text and get it read out aloud. An overview of supported languages in the Speech service is shown here:

https://learn.microsoft.com/en-us/azure/ai-services/speech-service/language-support?tabs=stt

Azure AI Speech Synthesis DEMO

You can create a TTS - Text To Speech service using Azure AI service for this. This Speech service in this demo uses the library Nuget Microsoft.CognitiveServices.Speech.

This repo contains a simple demo using Azure AI Speech synthesis using Azure.CognitiveServices.SpeechSynthesis.
It provides a simple way of synthesizing text to speech using Azure AI services. Its usage is shown here:

The code provides a simple builder for creating a SpeechSynthesizer instance.

using Microsoft.CognitiveServices.Speech;

namespace ToreAurstadIT.AzureAIDemo.SpeechSynthesis;

public class Program
{
    private static async Task Main(string[] args)
    {
        Console.WriteLine("Your text to speech input");
        string? text = Console.ReadLine();

        using (var synthesizer = SpeechSynthesizerBuilder.Instance.WithSubscription().Build())
        {
            using (var result = await synthesizer.SpeakTextAsync(text))
            {
                string reasonResult = result.Reason switch
                {
                    ResultReason.SynthesizingAudioCompleted => $"The following text succeeded successfully: {text}",
                    _ => $"Result of speeech synthesis: {result.Reason}"
                };
                Console.WriteLine(reasonResult);
            }
        }

    }

}

The builder looks like this:
using Microsoft.CognitiveServices.Speech;

namespace ToreAurstadIT.AzureAIDemo.SpeechSynthesis;

public class SpeechSynthesizerBuilder
{

    private string? _subscriptionKey = null;
    private string? _subscriptionRegion = null;

    public static SpeechSynthesizerBuilder Instance => new SpeechSynthesizerBuilder();

    public SpeechSynthesizerBuilder WithSubscription(string? subscriptionKey = null, string? region = null)
    {
        _subscriptionKey = subscriptionKey ?? Environment.GetEnvironmentVariable("AZURE_AI_SERVICES_SPEECH_KEY", EnvironmentVariableTarget.User);
        _subscriptionRegion = region ?? Environment.GetEnvironmentVariable("AZURE_AI_SERVICES_SPEECH_REGION", EnvironmentVariableTarget.User);
        return this;
    }

    public SpeechSynthesizer Build()
    {
        var config = SpeechConfig.FromSubscription(_subscriptionKey, _subscriptionRegion);
        var speechSynthesizer = new SpeechSynthesizer(config);
        return speechSynthesizer;
    }
}

Note that I observed that the audio could get chopped off in the very end. It might be a temporary issue, but if you encounter it too, you can add an initial pause to avoid this:

   string? intialPause = "     ....     "; //this is added to avoid the text being cut in the start

Sunday, 8 December 2024

Extending Azure AI Search with data sources

This article will present both code and tips around getting Azure AI Search to utilize additional data sources. The article builds upon the previous article in the blog:

https://toreaurstad.blogspot.com/2024/12/azure-ai-openai-chat-gpt-4-client.html

This code will use Open AI Chat GPT-4 together with additional data source. I have tested this using Storage account in Azure which contains blobs with documents. First off, create Azure AI services if you do not have this yet.


Then create an Azure AI Search


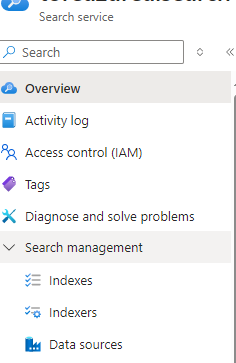
Choose the location and the Pricing Tier. You can choose the Free (F) pricing tier to test out the Azure AI Search. The standard pricing tier comes in at about 250 USD per month, so a word of caution here as billing might incur if you do not choose the Free tier. Head over to the Azure AI Search service after it is crated and note inside the Overview the Url. Expand the Search management and choose the folowing menu options and fill out them in this order:
  • Data sources
  • Indexes
  • Indexers


There are several types of data sources you can add.
  • Azure Blog Storage
  • Azure Data Lake Storage Gen2
  • Azure Cosmos DB
  • Azure SQL Database
  • Azure Table Storage
  • Fabric OneLake files

Upload files to the blob container

  • I have tested out adding a data source using Azure Blob Storage. I had to create a new storage account and I believe Azure might have changed it over the years, so for best compability, add a brand new storage account. Then choose a blob container inside the Blob storage, then hit the Create button.
  • Head over to your Storage browser inside your storage account, then choose Blob container. You can add a Blob container and then after it is created, click the Upload button.
  • You can then upload multiple files into the blob container (it is like a folder, which saves your files as blobs).

Setting up the index

  • After the Blob storage (storage account) is added to the data source, choose the Indexes menu button inside Azure AI search. Click Add index.
  • After the index is added, choose the button Add field
  • Add a field name called : Edit.String of type Edm.String.
  • Click the checkbox for Retrievable and Searchable. Click the button Save

Setting up the indexer

  • Choose to add an Indexer via button Add indexer
  • Choose the Index you added
  • Choose the Data source you added
  • Select the indexed extensions and specify which file types to index. Probably you should select text based files here, such as .md and .markdown files and even some binary file type such as .pdf and .docx can be selected here
  • Data to extract: Choose Content and metadata


Source code for this article

The source code can be cloned from this Github repo:
br /> https://github.com/toreaurstadboss/OpenAIDemo.git

The code for this article is available in the branch:
feature/openai-search-documentsources To add the data source to our ChatClient instance, we do the following. Please note that this method will be changed in the Azure AI SDK in the future :


            ChatCompletionOptions? chatCompletionOptions = null;
            if (dataSources?.Any() == true)
            {
                chatCompletionOptions = new ChatCompletionOptions();

                foreach (var dataSource in dataSources!)
                {
#pragma warning disable AOAI001 // Type is for evaluation purposes only and is subject to change or removal in future updates. Suppress this diagnostic to proceed.
                    chatCompletionOptions.AddDataSource(new AzureSearchChatDataSource()
                    {
                        Endpoint = new Uri(dataSource.endpoint),
                        IndexName = dataSource.indexname,
                        Authentication = DataSourceAuthentication.FromApiKey(dataSource.authentication)
                    });
#pragma warning restore AOAI001 // Type is for evaluation purposes only and is subject to change or removal in future updates. Suppress this diagnostic to proceed.
                }

            }


The updated version of the extension class of OpenAI.Chat.ChatClient then looks like this: ChatClientExtensions.cs


using Azure.AI.OpenAI.Chat;
using OpenAI.Chat;
using System.ClientModel;
using System.Text;

namespace ToreAurstadIT.OpenAIDemo
{
    public static class ChatclientExtensions
    {

        /// <summary>
        /// Provides a stream result from the Chatclient service using AzureAI services.
        /// </summary>
        /// <param name="chatClient">ChatClient instance</param>
        /// <param name="message">The message to send and communicate to the ai-model</param>
        /// <returns>Streamed chat reply / result. Consume using 'await foreach'</returns>
        public static AsyncCollectionResult<StreamingChatCompletionUpdate> GetStreamedReplyAsync(this ChatClient chatClient, string message,
            (string endpoint, string indexname, string authentication)[]? dataSources = null)
        {
            ChatCompletionOptions? chatCompletionOptions = null;
            if (dataSources?.Any() == true)
            {
                chatCompletionOptions = new ChatCompletionOptions();

                foreach (var dataSource in dataSources!)
                {
#pragma warning disable AOAI001 // Type is for evaluation purposes only and is subject to change or removal in future updates. Suppress this diagnostic to proceed.
                    chatCompletionOptions.AddDataSource(new AzureSearchChatDataSource()
                    {
                        Endpoint = new Uri(dataSource.endpoint),
                        IndexName = dataSource.indexname,
                        Authentication = DataSourceAuthentication.FromApiKey(dataSource.authentication)
                    });
#pragma warning restore AOAI001 // Type is for evaluation purposes only and is subject to change or removal in future updates. Suppress this diagnostic to proceed.
                }

            }

            return chatClient.CompleteChatStreamingAsync(
                [new SystemChatMessage("You are an helpful, wonderful AI assistant"), new UserChatMessage(message)], chatCompletionOptions);
        }

        public static async Task<string> GetStreamedReplyStringAsync(this ChatClient chatClient, string message, (string endpoint, string indexname, string authentication)[]? dataSources = null, bool outputToConsole = false)
        {
            var sb = new StringBuilder();
            await foreach (var update in GetStreamedReplyAsync(chatClient, message, dataSources))
            {
                foreach (var textReply in update.ContentUpdate.Select(cu => cu.Text))
                {
                    sb.Append(textReply);
                    if (outputToConsole)
                    {
                        Console.Write(textReply);
                    }
                }
            }
            return sb.ToString();
        }

    }
}


The updated code for the demo app then looks like this, I chose to just use tuples here for the endpoint, index name and api key:

ChatpGptDemo.cs


using OpenAI.Chat;
using OpenAIDemo;
using System.Diagnostics;

namespace ToreAurstadIT.OpenAIDemo
{
    public class ChatGptDemo
    {

        public async Task<string?> RunChatGptQuery(ChatClient? chatClient, string msg)
        {
            if (chatClient == null)
            {
                Console.WriteLine("Sorry, the demo failed. The chatClient did not initialize propertly.");
                return null;
            }

            Console.WriteLine("Searching ... Please wait..");

            var stopWatch = Stopwatch.StartNew();

            var chatDataSources = new[]{
                (
                    SearchEndPoint: Environment.GetEnvironmentVariable("AZURE_SEARCH_AI_ENDPOINT", EnvironmentVariableTarget.User) ?? "N/A",
                    SearchIndexName: Environment.GetEnvironmentVariable("AZURE_SEARCH_AI_INDEXNAME", EnvironmentVariableTarget.User) ?? "N/A",
                    SearchApiKey: Environment.GetEnvironmentVariable("AZURE_SEARCH_AI_APIKEY", EnvironmentVariableTarget.User) ?? "N/A"
                )
            };

            string reply = "";

            try
            {

                reply = await chatClient.GetStreamedReplyStringAsync(msg, dataSources: chatDataSources, outputToConsole: true);
            }
            catch (Exception ex)
            {
                Console.WriteLine(ex.Message);
            }

            Console.WriteLine($"The operation took: {stopWatch.ElapsedMilliseconds} ms");


            Console.WriteLine();

            return reply;
        }

    }
}


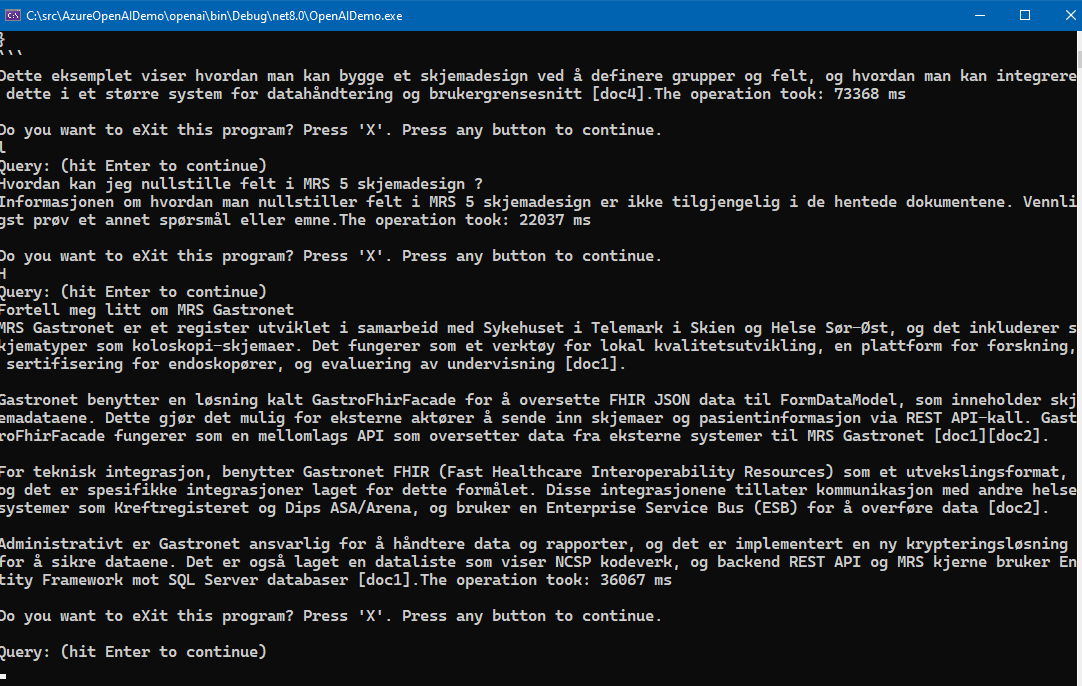
The code here expects that three user-specific environment variables exists. Please note that the API key can be found under the menu item Keys in Azure AI Search. There are two admin keys and multiple query keys. To distribute keys to other users, you of course share the API query key, not the admin key(s). The screenshot below shows the demo. It is a console application, it could be web application or other client : Please note that the Free tier of Azure AI Search is rather slow and seems to only allow queryes at a certain interval, it will suffice to just test it out. To really test it out in for example an Intranet scenario, the standard tier Azure AI search service is recommended, at about 250 USD per month as noted.

Conclusions

Getting an Azure AI Chat service to work in intranet scenarios using a combination of Open AI Chat GPT-4 together with a custom collection of files that are indexed offers a nice combination of building up a knowledge base which you can query against. It is rather convenient way of building an on-premise solution for intranet AI chat service using Azure cloud services.

Monday, 2 December 2024

Azure AI OpenAI chat GPT-4 client connection

This article presents code that shows how you can connect to OpenAI Chat GPT-4 client connection. The repository for the code presented is the following GitHub repo:

https://github.com/toreaurstadboss/OpenAIDemo

The repo contains useful helper methods to use Azure AI Service and create AzureOpenAIClient or the more generic ChatClient which is a specified chat client for the AzureOpenAIClient that uses a specific ai model, default ai model to use is 'gpt-4'. The creation of chat client is done using a class with a builder pattern. To create a chat client you can simply create it like this :

Program.cs

         const string modelName = "gpt-4";

            var chatClient = AzureOpenAIClientBuilder
                .Instance
                .WithDefaultEndpointFromEnvironmentVariable()
                .WithDefaultKeyFromEnvironmentVariable()
                .BuildChatClient(aiModel: modelName);
                

The builder looks like this:

AzureOpenAIClientBuilder.cs


using Azure.AI.OpenAI;
using OpenAI.Chat;
using System.ClientModel;

namespace ToreAurstadIT.OpenAIDemo
{

    /// <summary>
    /// Creates AzureOpenAIClient or ChatClient (default model is "gpt-4")
    /// Suggestion:
    /// Create user-specific Environment variables for : AZURE_AI_SERVICES_KEY and AZURE_AI_SERVICES_ENDPOINT to avoid exposing endpoint and key in source code.
    /// Then us the 'WithDefault' methods to use the two user-specific environment variables, which must be set.
    /// </summary>
    public class AzureOpenAIClientBuilder
    {

        private const string AZURE_AI_SERVICES_KEY = nameof(AZURE_AI_SERVICES_KEY);
        private const string AZURE_AI_SERVICES_ENDPOINT = nameof(AZURE_AI_SERVICES_ENDPOINT);

        private string? _endpoint = null;
        private ApiKeyCredential? _key = null;

        public AzureOpenAIClientBuilder WithEndpoint(string endpoint) { _endpoint = endpoint; return this; }

        /// <summary>
        /// Usage: Provide user-specific enviornment variable called : 'AZURE_AI_SERVICES_ENDPOINT'
        /// </summary>
        /// <returns></returns>
        public AzureOpenAIClientBuilder WithDefaultEndpointFromEnvironmentVariable() { _endpoint = Environment.GetEnvironmentVariable(AZURE_AI_SERVICES_ENDPOINT, EnvironmentVariableTarget.User); return this; }
       
        
        public AzureOpenAIClientBuilder WithKey(string key) { _key = new ApiKeyCredential(key); return this; }       
        public AzureOpenAIClientBuilder WithKeyFromEnvironmentVariable(string key) { _key = new ApiKeyCredential(Environment.GetEnvironmentVariable(key) ?? "N/A"); return this; }

        /// <summary>
        /// Usage : Provide user-specific environment variable called : 'AZURE_AI_SERVICES_KEY'
        /// </summary>
        /// <returns></returns>
        public AzureOpenAIClientBuilder WithDefaultKeyFromEnvironmentVariable() { _key = new ApiKeyCredential(Environment.GetEnvironmentVariable(AZURE_AI_SERVICES_KEY, EnvironmentVariableTarget.User) ?? "N/A"); return this; }

        public AzureOpenAIClient? Build() => !string.IsNullOrWhiteSpace(_endpoint) && _key != null ? new AzureOpenAIClient(new Uri(_endpoint), _key) : null;

        /// <summary>
        /// Default model will be set 'gpt-4'
        /// </summary>
        /// <returns></returns>
        public ChatClient? BuildChatClient(string aiModel = "gpt-4") => Build()?.GetChatClient(aiModel);

        public static AzureOpenAIClientBuilder Instance => new AzureOpenAIClientBuilder();

    }
}


It is highly recommended to store your endpoint and key to the Azure AI service of course not in the source code repository, but another place, for example on your user-specific environment variable or Azure key vault or similar place hard to obtain for malicious use, for example using your account to route much traffic to Chat GPT-4 only to end up being billed for this traffic. The code provided some 'default methods' which will look for environment variables. Add the key and endpoint to your Azure AI to these user specific environment variables.
  • AZURE_AI_SERVICES_KEY
  • AZURE_AI_SERVICES_ENDPOINT

To use the chat client the following code shows how to do this:

ChatGptDemo.cs


    public async Task<string?> RunChatGptQuery(ChatClient? chatClient, string msg)
        {
            if (chatClient == null)
            {
                Console.WriteLine("Sorry, the demo failed. The chatClient did not initialize propertly.");
                return null;
            }

            var stopWatch = Stopwatch.StartNew();

            string reply = await chatClient.GetStreamedReplyStringAsync(msg, outputToConsole: true);

            Console.WriteLine($"The operation took: {stopWatch.ElapsedMilliseconds} ms");


            Console.WriteLine();

            return reply;
        }
        
        
The communication against Azure AI service with Open AI Chat-GPT service is this line:

ChatGptDemo.cs


    string reply = await chatClient.GetStreamedReplyStringAsync(msg, outputToConsole: true);

The Chat GPT-4 service will return the data streamed so you can output the result as quickly as possible. I have tested it out using Standard Service S0 tier, it is a bit slower than the default speed you get inside the browser using Copilot, but it works and if you output to the console, you get a similar experience. The code here can be used in different environments, the repo contains a console app with .NET 8.0 Framework, written in C# as shown in the code. Here is the helper methods for the ChatClient, provided as extension methods.

ChatclientExtensions.cs


using OpenAI.Chat;
using System.ClientModel;
using System.Text;

namespace OpenAIDemo
{
    public static class ChatclientExtensions
    {

        /// <summary>
        /// Provides a stream result from the Chatclient service using AzureAI services.
        /// </summary>
        /// <param name="chatClient">ChatClient instance</param>
        /// <param name="message">The message to send and communicate to the ai-model</param>
        /// <returns>Streamed chat reply / result. Consume using 'await foreach'</returns>
        public static AsyncCollectionResult<StreamingChatCompletionUpdate> GetStreamedReplyAsync(this ChatClient chatClient, string message) =>
            chatClient.CompleteChatStreamingAsync(
                [new SystemChatMessage("You are an helpful, wonderful AI assistant"), new UserChatMessage(message)]);

        public static async Task<string> GetStreamedReplyStringAsync(this ChatClient chatClient, string message, bool outputToConsole = false)
        {
            var sb = new StringBuilder();
            await foreach (var update in GetStreamedReplyAsync(chatClient, message))
            {
                foreach (var textReply in update.ContentUpdate.Select(cu => cu.Text))
                {
                    sb.Append(textReply);
                    if (outputToConsole)
                    {
                        Console.Write(textReply);
                    }
                }
            }
            return sb.ToString();
        }

    }
}


The code presented here should make it a bit easier to communicate with the Azure AI Open AI Chat GPT-4 service. See the repository to test out the code. Screenshot below shows the demo in use in a console running against the Azure AI Chat GPT-4 service :