Sunday 4 November 2018

Closing branches in Git

Git unlike Mercurial has no builtin support for closing branches. This leads to a proliferation of branches and running git branch -a to view remote branches or git branch will show ever more branches. Actually, closing a branch in Git can be supported through the use of tags. We decide to keep the tag for future use, so that we can use it to check out a new branch from this tag. Another way would of course be to just delete a brach local and/or remote, but that is not the same as closing a branch. Closing a branch in Mercurial still makes it possible to reopen it again for later work. Anyways, in this article, I will show two aliases which can be used to close a branch, either both local and remote or just remote. Put the following into the [alias] section of your .gitConfig file:

closebranch = "!w() { echo Attempting to close local and remote branch: $1 Processing...; echo Checking the branch $1 out..; git checkout $1; echo Trying to create a new tag archive/$1; git tag archive/\"$1\"; git push origin archive/\"$1\"; echo Deleting the local branch $1; git branch -d $1;  echo Deleting the remote branch $1; git push origin --delete $1; echo Done. To restore the closed branch later, enter: git checkout -b MyNewBranch archive/\"$1\"; }; w"

closebranchpassive = "!w() { echo Attempting to close local and remote branch: $1 Processing...; echo Checking the branch $1 out..; git checkout $1; echo Trying to create a new tag archive/$1; git tag archive/\"$1\"; git push origin archive/$1; echo Deleting the local branch $1;   echo Deleting the remote branch $1;  echo Done. To restore the closed branch later, enter: git checkout -b MyNewBranch archive/\"$1\"; }; w"

closeremotebranch =  "!w() { echo Attempting to close remote branch: $1 Processing...; echo Checking the branch $1 out..; git checkout $1;  echo Trying to create a new tag archive/$1; git tag archive/\"$1\"; git push origin archive/\"$1\"; echo Deleting the remote branch $1; git push origin --delete $1; echo Done. To restore the closed branch later, enter: git checkout -b MyNewBranch archive/\"$1\"; }; w"

What we do here is the following:
  • Check out the branch to close
  • Tag this branch as archive/branchname
  • Important - push the tag the remote e.g. origin in the provided aliased commands above
  • (Delete the local branch)
  • Delete the remote branch
  • Display a friendly output message how to restore the branch later through a tag
What we use here is a shell function in each alias. This allows us to do multiple commands in Git through a simple aliased command. Say you want to close a local and remote branch called MyBranchToBeClosed. Just enter: git closebranch MyBranchToBeClosed If you just want to close the remote branch and keep the local one, enter: git closeremotebranch MyBranchToBeClosed To restore the branch MyBranchToBeClosed (which now is actually closed!) later, just enter: git checkout -b MyRestoredBranch archive/MyBranchToBeClosed This lets you keep old branch around as tags and not proliferate the branch listings. We however have moved the branch(es) over to tags prefixed with archive/ I wish Git was simpler to use sometimes so we did not have to use such hacks, closing branches should be easy.

Wednesday 17 October 2018

Working with Netsh http sslcert setup and SSL bindings through Powershell

I am working with a solution at work where I need to enable IIS Client certificates. I am not able to get past the "Provide client certificate" dialog, but it is possible to alter the setup of SSL cert bindings on your computer through the Netsh command. This command is not in Powershell, but at the command line. I decided to write some Powershell functions to be able to alter this setup atleast in an easier way. One annoyance with the netsh command is that you have to keep track of the Application Id and Certificate hash values. Here, we can easier keep track of this through Powershell code. The Powershell code to display and alter, modify, delete and and SSL cert bindings is as follows:

function Get-NetshSetup($sslBinding='0.0.0.0:443') {

$sslsetup = netsh http show ssl 0.0.0.0:443
#Get-Member -InputObject $sslsetup

$sslsetupKeys = @{}

foreach ($line in $sslsetup){
 if ($line -ne $null -and $line.Contains(': ')){
    
    $key = $line.Split(':')[0]
    $value = $line.Split(':')[1]
     if (!$sslsetupKeys.ContainsKey($key)){
       $sslsetupKeys.Add($key.Trim(), $value.Trim()) 
      }
    } 
}


return $sslsetup

}

function Display-NetshSetup($sslBinding='0.0.0.0:443'){
 
 Write-Host SSL-Setup is: 

 $sslsetup = Get-NetshSetup($sslBinding)

foreach ($key in $sslsetup){
 Write-Host $key $sslsetup[$key]
}
}

function Modify-NetshSetup($sslBinding='0.0.0.0:443', $certstorename='My',
  $verifyclientcertrevocation='disable', $verifyrevocationwithcachedcleintcertonly='disable',
  $clientCertNegotiation='enable', $dsmapperUsage='enable'){
  $sslsetup = Get-NetshSetup($sslBinding)
 
  echo Deleting sslcert netsh http binding for $sslBinding ...
  netsh http delete sslcert ipport=$sslBinding
  echo Adding sslcert netsh http binding for $sslBinding...
  netsh http add sslcert ipport=$sslBinding certhash=$sslsetup['Certificate Hash'] appid=$sslsetup['Application ID'] certstorename=$certstorename verifyclientcertrevocation=$verifyclientcertrevocation verifyrevocationwithcachedclientcertonly=$verifyrevocationwithcachedcleintcertonly clientcertnegotiation=$clientCertNegotiation dsmapperusage=$dsmapperUsage
  echo Done. Inspect output.  
  Display-NetshSetup $sslBinding
}


function Add-NetshSetup($sslBinding, $certstorename, $certhash, $appid, 
  $verifyclientcertrevocation='disable', $verifyrevocationwithcachedcleintcertonly='disable',
  $clientCertNegotiation='enable', $dsmapperUsage='enable'){

  echo Adding sslcert netsh http binding for $sslBinding...
  netsh http add sslcert ipport=$sslBinding certhash=$certhash appid=$appid  clientcertnegotiation=$clientCertNegotiation dsmapperusage=$dsmapperUsage certstorename=$certstorename verifyclientcertrevocation=$verifyclientcertrevocation verifyrevocationwithcachedclientcertonly=$verifyrevocationwithcachedcleintcertonly 
   
  echo Done. Inspect output.  
  Display-NetshSetup $sslBinding
}


#Get-NetshSetup('0.0.0.0:443'); 
Display-NetshSetup
#Modify-NetshSetup 
Add-NetshSetup '0.0.0.0:443' 'MY' 'c0fe06da89bcb8f22da8c8cbdc97be413b964619' '{4dc3e181-e14b-4a21-b022-59fc669b0914}'
Display-NetshSetup 


Saturday 29 September 2018

Injecting text in html lists into lists using Sass

I wanted to test out if I could inject text via Sass style sheets to see if Sass could somehow support this. Of course, this is already possible in CSS using the nth-child selector and the ::after selector. Here is a sample of the technique used in this article! In Sass, however, we can inject text into a large list if we want. This means that the DOM must support the data you want to inject, if you want to inject for example five strings into an array of <ul> of <li> items, you must also have five items of <li> Anyways, this is what I ended up with:

$baskerville-font-stack: "Big Caslon", "Book Antiqua", "Palatino Linotype", Georgia, serif !default;

ul li {
 font-family: $baskerville-font-stack;
}

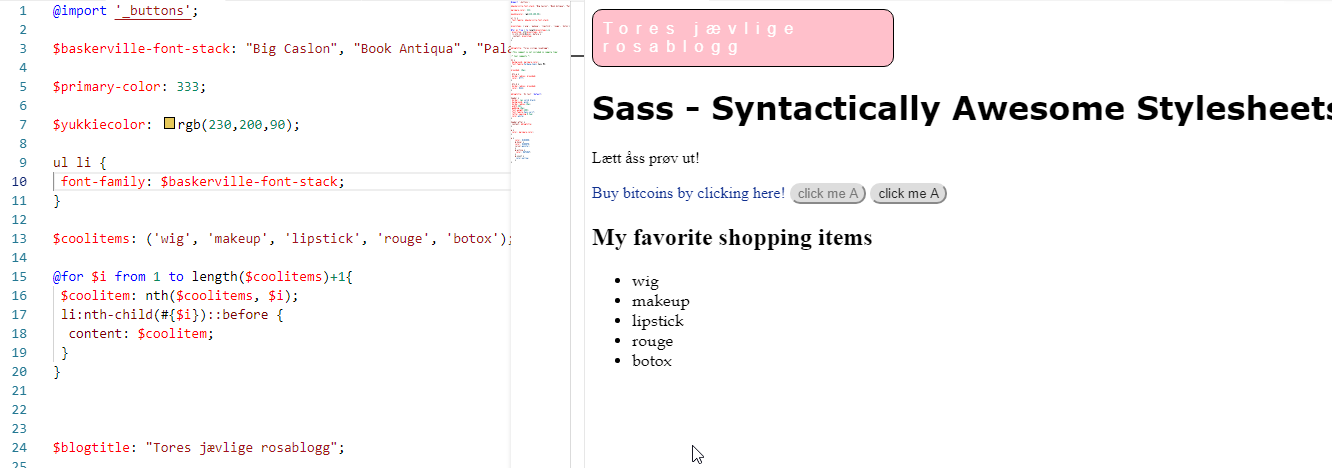
$coolitems: ('wig', 'makeup', 'lipstick', 'rouge', 'botox');

@for $i from 1 to length($coolitems)+1{
 $coolitem: nth($coolitems, $i);
 li:nth-child(#{$i})::before {
  content: $coolitem;
 }
}

$blogtitle: "Tores jævlige rosablogg"; 

We first declare an array in Sass using $coolitems: ('wig', 'makeup', 'lipstick', 'rouge', 'botox'). We then use the @for loop in Sass to get loop through this array. The syntax is: @for $i from 1 to length($coolarray)+1 I had to use the +1 here in my sample.. Then we grab hold of the current item using the nth function, passing in the array $coolitems and specifying the index $i. Now that we have the item of the $coolitems array, we can set the content CSS property of the n-th child and use the ::before (or ::after) selector. I tried to avoid using the +1 in the for loop, but then the last item of my array was not included in the list. Note - the use of the #{$i} in the syntax above. This is called variable interpolation in Sass. It is similar syntax-wise to variable interpolation in shell scripts, actually. We use it so that we can refer to the variable $i inside the nth-child operator of CSS selector. And the nth operator is as noted used to grab hold of the nth item of the Sass array. And your HTML will then look like this:
  <ul> 
            <li></li>   
            <li></li>           
            <li></li>  
            <li></li>    
            <li></li>        
        </ul>
So you actually now have a list in HTML which is empty, but the values are injected through CSS! And Sass makes supporting such scenarios easier. Now why the heck would you want such a thing? I do not know, I am more a backend developer than webdev frontend developer, it is though cool that you can load up data into the DOM using Sass and CSS