DECLARE @currentDB AS VARCHAR(100)
DECLARE @mrsdb_sqlscript AS NVARCHAR(500)
DECLARE db_cursor CURSOR FOR
SELECT name from sys.databases where state_desc <> 'offline' and name not in ('master', 'tempdb', 'model', 'msdb') order by name
DROP TABLE IF EXISTS #largestTables
CREATE TABLE #largestTables (
 DatabaseName VARCHAR(100),
 SchemaName VARCHAR(200),
 TableName VARCHAR(200),
 TotalRowCount INT
)

OPEN db_cursor
FETCH NEXT from db_cursor into @currentDB

WHILE @@FETCH_STATUS = 0
BEGIN
 SET @mrsdb_sqlscript = N'INSERT INTO #largestTables
  SELECT ''' + @currentDB + ''' , SCHEMA_NAME(schema_id) AS [SchemaName],
 [Tables].name AS [TableName],
 SUM([Partitions].[rows]) AS [TotalRowCount]
 FROM ' + @currentDB + '.sys.tables AS [Tables]
 JOIN ' + @currentDB + '.sys.partitions AS [Partitions]
 ON [Tables].[object_id] = [Partitions].[object_id]
 AND [Partitions].index_id IN ( 0, 1 )
 GROUP BY SCHEMA_NAME(schema_id), [Tables].name';

 PRINT 'Looking for largest table in the following DB: ' + @currentDB
 exec sp_executesql @mrsdb_sqlscript

 FETCH NEXT FROM db_cursor into @currentDB
END

CLOSE db_cursor
DEALLOCATE db_cursor

SELECT TOP 100 * FROM #largestTables
ORDER BY TotalRowCount DESC, Schemaname ASC
The SQL script above will use a temporary table variable and database cursor and loop through all databases, executing a SQL script that will insert data into a temporary table variable and after the cursor has looped through its dataset, the result in the temporary
table variable is presented to the DBA monitoring.
Use it to spot where you have much data in your databases of the data base server you are working with!
Tuesday, 30 April 2019
Finding databases with biggest tables in SQL Server
I created a T-SQL script today for use with SQL Server that will list the tables that have most rows for SQL Server, able to loop through all databases.
Friday, 29 March 2019
Quickly search your Git log using wildcards and shell function
Imagine you got a Git repository with a long history - equivalent to log - and you want find a changeset with a comment containing a word or some words and you want to get the commit SHA
to quickly cherry pick that commit to your target branch. This is easier using Azure Devops or some tool, but how to quickly search the log.
First we define a search log shell function inside our git config file .gitconfig :

searchlog = "!f() { git --no-pager log --color-words --all --decorate --graph -i --grep \"$1\"; }; f"
Now we can search the log quickly using a wildcard:
git searchlog "visning.*av.*nåtidslinje.*"We separate our search words with the .* regex syntax and we can search our git log for multiple keywords quickly and get a nice presentation of commits with commit messages matching our log. And now we have a quick way to find our Git commits through the log and the command line to overcome our needly in the haystack scenario.
Monday, 25 March 2019
Importing datetime columns from Excel into SPSS
I have been working with SPSS and Excel import the latest days. The following Python script written in SPSS will import your Excel datetime columns properly.
Note that in my example I use the convention that a date column in my dataset contains 'date' or 'lastupdate'.
* Encoding: UTF-8.
begin program.
import spss
print "Variable count: " + str(spss.GetVariableCount())
previousVar=""
for ind in range(spss.GetVariableCount()): #Loop through variable indices
    if (ind < 0):
     previousVar = spss.GetVariableName(ind-1) #get variable name of previous column
    varNam = spss.GetVariableName(ind) #Look up each variable name

    recognizedDateColumns = ('date', 'lastupdate')
    if any(s in varNam.lower() for s in recognizedDateColumns):
     print "Variable contains Dato: " + varNam
     adjustedVariable = varNam + "_Justert"
     spss.Submit("COMPUTE " + adjustedVariable + " = DATE.MDY(1,1,1900) +( (" + varNam  + " - 2) * 24 * 60 * 60).")
     spss.Submit("FORMATS " + adjustedVariable + "(DATETIME22).")
     spss.Submit("RENAME VARIABLES (" + varNam + "=" + adjustedVariable + ") (" + adjustedVariable + "= " + varNam + ").")
     spss.Submit("ADD FILES FILE = * /KEEP=PasientGUID to " + previousVar + " " + varNam + " ALL.")
     spss.Submit("EXECUTE.")
     spss.Submit("DELETE VARIABLES " + adjustedVariable + ".")
     spss.Submit("EXECUTE.")
end program.
Note that in my example I use the convention that a date column in my dataset contains 'date' or 'lastupdate'.
Tuesday, 26 February 2019
Powershell - starting and stopping multiple app pools
The following powershell script defines some functions in Powershell that can start up or stop all iis app pools on a server. It can be handy when you want to
test out concurrency issues and switch off all IIS app pools and start up again.
Function fnStartApplicationPool([string]$appPoolName){
Import-Module WebAdministration
 if ((Get-WebAppPoolState $appPoolName).Value -ne 'Started') {
  Write-Host 'IIS app pool ' $appPoolName ' is not started. Starting.'
  Start-WebAppPool -Name $appPoolName
  Write-Host 'IIS app pool ' $appPoolName 'started'
 }
}

Function fnStartAllApplicationPools() {
Import-Module WebAdministration
 Write-Host "Starting all app pools"
 $appPools = (Get-ChildItem IIS:\AppPools)

foreach ($appPool in $appPools) {
  & fnStartApplicationPool -appPoolName $appPool.Name
}
}

#fnStartAllApplicationPools #start all applications pools


Function fnStopApplicationPool([string]$poolname) {
Import-Module WebAdministration
 if ((Get-WebAppPoolState $appPoolName).Value -ne 'Stopped') {
  Stop-WebAppPool -Name $appPoolName
 }
}

Function fnStopAllApplicationPools(){
Import-Module WebAdministration
 Write-Host "Starting all app pools"
 $appPools = (Get-ChildItem IIS:\AppPools)

foreach ($appPool in $appPools) {
  & fnStopApplicationPool-appPoolName $appPool.Name
}

}

#fnStopAllApplicationPools #start all applications pools
Saturday, 23 February 2019
Serializing a data contract with xml declaration and indented formatting
This code will serialize your object graph and also do xml indentation and adding an xml declaration at the top, using DataContractSerializer.
public static string SerializeObjectIndentedTo use it, just pass in your object and get an xml back!(T dataContract, bool omitXmlDeclaration = false) where T : class { using (var output = new StringWriter()) { using (var writer = new XmlTextWriter(output) { Formatting = Formatting.Indented }) { if (!omitXmlDeclaration) writer.WriteStartDocument(); var serializer = new System.Runtime.Serialization.DataContractSerializer(typeof(T)); serializer.WriteObject(writer, dataContract); return output.GetStringBuilder().ToString(); } } }
Saturday, 5 January 2019
Debugging Create React App javascript and tests in Visual Studio Code
This is a handy collection of configurations for debugging your Create React App javscript code (launching Chrome) and also tests generated with Create React App (CRA).
Note that the last one does not work probably if you have ejected the CRA. Here is the .vscode/launch.json file:
{
 // Use IntelliSense to learn about possible attributes.
 // Hover to view descriptions of existing attributes.
 // For more information, visit: https://go.microsoft.com/fwlink/?linkid=830387
 "version": "0.2.0",
 "configurations": [
  {
   "name": "Chrome debug 3000",
   "type": "chrome",
   "request": "launch",
   "url": "https://localhost:3000",
   "webRoot": "${workspaceRoot}/src"
  },
  {
   "name": "Debug CRA Tests",
   "type": "node",
   "request": "launch",
   "runtimeExecutable": "${workspaceRoot}/node_modules/.bin/react-scripts",
   "args": [
    "test",
    "--runInBand",
    "--no-cache"
   ],
   "cwd": "${workspaceRoot}",
   "protocol": "inspector",
   "console": "integratedTerminal",
   "internalConsoleOptions": "neverOpen"
  }
 ]
}
Friday, 28 December 2018
Debugging http Node.js server requests and responses from shell
Here is a cool tip to inspect Node.js running an http process / server.
First off, we start a simple http server in Node.js like this:

const http = require('http');
const server = http.createServer((req, res) => {
res.end("Why hello world!
\n");
});
server.listen(4242, () => {
console.log("Server is running...");
});
This sets up a http server in Node.js. The http module is built-in in Node.js, we only have to require it (import in ES6).
Now, just enter the following (I use Windows Subsystem for Linux - WSL in this case) in your shell to export NODE_DEBUG environment variable:
export NODE_DEBUG=http
We can now see requests and responses in our Node.js server! (Image below uses Wsl-Terminal as our terminal against WSL).
Sunday, 23 December 2018
Canceling Promise in Javascript
Canceling Promise in Js is a often sough after functionality, that can be provided by wrapping the Promise async function and provide canceling abilities. This will in functionality be similar to what we can do
in C# with a CancellationTokenSource using in System.Threading.Task objects. We can invoke asynchronous function in Js with Promise, but if the user navigates away from a View or Page in for example React Native component, clicking a button to go to another Component, we must tidy up already started Promise operations such as fetch and here is the code to achieve that.
First off, we define and export a makeCancelable method to be able to cancel a Promise.
/**
 * Wraps a promise into a cancelable promise, allowing it to be canceled. Useful in scenarios such as navigating away from a view or page and a fetch is already started.
 * @param {Promise}   promise           Promise object to cancel.
 * @return {Object with wrapped promise and a cancel function}
 */
export const makeCancelable = (promise) => {
    let hasCanceled = false;

    const wrappedPromise = new Promise((resolve, reject) => {
        promise.then(value => hasCanceled ? reject({ isCanceled: true }) : resolve(value),
            error => hasCanceled ? reject({ isCanceled: true }) : reject(error)
        );
    });

    return {
        promise: wrappedPromise,
        cancel() {
            hasCanceled: true;
        }
    };

};
The promise is wrapped with additional logic to check a boolean flag in a variable hasCanceled that either rejects the Promise if it is canceled or resolves the Promise (fullfils the async operation).
Returned is an object in Js with the Promise itself in a primise attribute and the function cancel() which sets the boolean flag hasCanceled to true, effectively rejecting the Promise and rejecting it.
Example usage below:
'use strict';

import React, { Component } from 'react';
import { TextInput, Text, View, StyleSheet, Image, TouchableHighlight, ActivityIndicator, FlatList, AsyncStorage } from 'react-native';
import AuthService from './AuthService';
import { makeCancelable } from './Util';

const styles = StyleSheet.create({
    container: {
        backgroundColor: '#F5FCFF',
        flex: 1,
        paddingTop: 40,
        alignItems: 'center'
    },
    heading: {
        fontSize: 30,
        fontWeight: '100',
        marginTop: 20
    },
    input: {
        height: 50,
        marginTop: 10,
        padding: 4,
        margin: 2,
        alignSelf: 'stretch',
        fontSize: 18,
        borderWidth: 1,
        borderColor: '#48bbec'
    },
    button: {
        height: 50,
        backgroundColor: '#48bbec',
        alignSelf: 'stretch',
        marginTop: 10,
        justifyContent: 'center'
    },
    buttonText: {
        fontSize: 22,
        color: '#FFF',
        alignSelf: 'center'
    },
    error: {
        fontWeight: '300',
        fontSize: 20,
        color: 'red',
        paddingTop: 10
    }
});

const cancelableSearchRepositoriesPromiseFetch = makeCancelable(fetch('https://api.github.com/search/repositories?q=react'));

class LoginForm extends Component {

    constructor(props) {
        super(props);

        this.state = {
            showProgress: false,
            username: '',
            password: '',
            repos: [],
            badCredentials: false,
            unknownError: false,
        };


    }

    onLoginPressed() {
        this.setState({ showProgress: true });

        var reposFound = [];

        var authService = new AuthService();

        authService.login({
            username: this.state.username, password: this.state.password
        }, (results) => {
            this.setState(Object.assign({ showProgress: false }, results));

            if (this.state.success && this.props.onLogin) {
                this.props.onLogin();
            }

        });


        cancelableSearchRepositoriesPromiseFetch.promise.then((response) => { return response.json(); })
            .then((results) => {
                results.items.forEach(item => {
                    reposFound.push(item);
                });
                this.setState({ repos: reposFound, showProgress: false });
            });
    }

    componentWillMount() {
        this._retrieveLastCredentials();
        cancelableSearchRepositoriesPromiseFetch.cancel();
    }

    _retrieveLastCredentials = async () => {

        var lastusername = await AsyncStorage.getItem("GithubDemo:LastUsername");
        var lastpassword = await AsyncStorage.getItem("GithubDemo:LastPassword");
        this.setState({ username: lastusername, password: lastpassword });
    }

    _saveLastUsername = async (username) => {
        if (username != null) {
            await AsyncStorage.setItem("GithubDemo:LastUsername", username);
        }
    }

    _savePassword = async (password) => {
        if (password != null) {
            await AsyncStorage.setItem("GithubDemo:LastPassword", password);
        }
    }

    componentWillUnmount() {

    }

    render() {


        var errorCtrl = <View />;

        if (!this.state.success && this.state.badCredentials) {
            errorCtrl = <Text color='#FF0000' style={styles.error}>That username and password combination did not work</Text>
        }

        if (!this.state.success && this.state.unknownError) {
            errorCtrl = <Text color='#FF0000' style={styles.error}>Unexpected error while logging in. Try again later</Text>
        }

        return (
            <View style={styles.container}>
                <Image style={{ width: 66, height: 55 }} source={require('./assets/Octocat.png')} />
                <Text style={styles.heading}>Github browser</Text>
                <TextInput value={this.state.username} onChangeText={(text) => { this._saveLastUsername(text); this.setState({ username: text }); }} style={styles.input} placeholder='Github username' />
                <TextInput value={this.state.password} textContentType={'password'} multiline={false} secureTextEntry={true} onChangeText={(text) => { this._savePassword(text); this.setState({ password: text }); }} style={styles.input} placeholder='Github password' />
                <TouchableHighlight style={styles.button} onPress={this.onLoginPressed.bind(this)}>
                    <Text style={styles.buttonText}>Log in</Text>
                </TouchableHighlight>
                {errorCtrl}
                <ActivityIndicator animating={this.state.showProgress} size={"large"} />
                <FlatList keyExtractor={item => item.id} data={this.state.repos} renderItem={({ item }) => <Text>{item.full_name}</Text>} />

            </View>
        );

    }


}

export default LoginForm;
Thursday, 20 December 2018
React native - Checkboxes and date pickers for IoS
This article will look at checkboxes and date pickers for IoS apps in React Native. For checkboxes, we use the built-in Switch control. For Date pickers we use the built-in DatePickerIOS control.
 This is the basic JS / JSX to get you started! Note the use of a basic state variable to keep track of the chosenDate. The onDateChange callback uses an arrow inline function to update the state variable. We also set the minimum and maximum datetime allowed and some othern nice props of the control!
App.js
This is the basic JS / JSX to get you started! Note the use of a basic state variable to keep track of the chosenDate. The onDateChange callback uses an arrow inline function to update the state variable. We also set the minimum and maximum datetime allowed and some othern nice props of the control!
App.js

import React from 'react';
import { StyleSheet, Text, View, DatePickerIOS, Switch } from 'react-native';

export default class App extends React.Component {

  constructor(props){
    super(props);
    this.state = { chosenDate : new Date(), isDatePickerVisible: false };

    this.setDate = this.setDate.bind(this);
  }

  setDate(newDate){
    this.setState({chosenDate: newDate })
  }


  render() {
    return (
      <View style={styles.container}>

        <Switch onValueChange={(val) => this.setState({ isDatePickerVisible : val })} value={this.state.isDatePickerVisible} ios_backgroundColor={"aliceblue"} trackColor={true} />
        <Text style={{ display: this.state.isDatePickerVisible ? "none" : "flex"}}>Choose datetime..</Text>

        <View style={{ display: this.state.isDatePickerVisible ? "flex" : "none" }}>
         <DatePickerIOS locale="no" mode={"datetime"} minuteInterval={10} minimumDate={new Date(2018,11,1)} maximumDate={new Date(2018,11,31)}
          style={{ borderWidth: 1, borderColor: 'gray'}} onDateChange={this.setDate} date={this.state.chosenDate} />
         <Text>{this.state.chosenDate.toLocaleDateString() + " " + this.state.chosenDate.toLocaleTimeString()}</Text>
        </View>

      </View>
    );
  }
}

const styles = StyleSheet.create({
  container: {
    flex: 1,
    justifyContent: 'center',
  },
});
React Native apps with Expo - Radio buttons
This article will present how you can add Radio buttons into your React Native app. I am using Expo to build the React Native app and Visual Studio code as the editor and IDE.
You can run this app by downloading the Expo app from App Store and run the following sample by opening the Camera on your mobile and scan the QR code. This will launch Expo
app and run the app.
WidgetDemos - React Native app with radio buttons demo
First off, you can install Expo using npm and the following command:

App.js
npm install expo-cli --global
You can initialize a project using these two commands:
expo init MyRadioButtonProject
cd MyRadioButtonProject
expo start
Expo's website contains good documentation here:
We can use the built in React Native control SegmentedControlIOS from React native and the following code:
import React, { Component } from 'react';
import { StyleSheet, Text, View, SegmentedControlIOS } from 'react-native';

export default class Widget extends Component {

    constructor(props) {
        super(props);

    this.state = {
            selectedMoreFruitIndex: 0,
        };

    }

    setMoreFruitIndex(event) {
        this.setState({ selectedMoreFruitIndex: event.nativeEvent.selectedSegmentIndex })
    };

   render(){

   return (
            <View>

                <SegmentedControlIOS
                    values={['banana', 'apple']}
                    selectedIndex={this.state.selectedMoreFruitIndex}
                    onChange={(event) => this.setMoreFruitIndex(event)}
                />


            </View >
        );

  };

..
The SegmentControlIOS is simple to get started with, but it is not so easy to set up with compound objects, it only supports a string array. Hence, you cannot specify a label and a value to each
radio button item. Instead use the SegmentedControls from the 'react-native-radio-buttons' package.
We import this npm package using:
npm install react-native-radio-buttons --save
The npm package has got a home and documentation here:
https://www.npmjs.com/package/react-native-radio-buttons
First off, we define an array of fruit objects and put these into a state variable (array of objects) inside the constructor
 constructor(props) {
..
 let moreFruits = [{ label: 'Strawberry', value: 'Strawberry' },
        { label: 'Melon', value: 'Melon' },
        { label: 'Pineapple', value: 'Pineapple' },
        { label: 'Grapes', value: 'Grapes' },
        ];

        this.state = {
            selectedFruit: 'Pick your favorite fruit',
            selectedMoreFruitIndex: 0,
            selectedMoreFruit: null,
            moreFruits: moreFruits
        }

.. }
We use the SegmentedControls by importing at the top and defining it inside the View returned in the render method:
import RadioButtons, { SegmentedControls } from 'react-native-radio-buttons'; //RadioButtons not needed in this example

//..inside views of render

  <SegmentedControls
                    options={this.state.moreFruits}
                    direction='row'
                    onSelection={option => this.setSelectedOption(option)}
                    selectedOption={this.state.selectedMoreFruit}
                    extractText={(option) => option.label}
                ></SegmentedControls>
The method setSelectedOption and more can be read in the code listing below of Widget.js. I include also App.js below, the starting component:
Widget.js
import React, { Component } from 'react';
import { StyleSheet, Text, View, TextInput, Button, RadioGroup, TouchableWithoutFeedback, SegmentedControlIOS } from 'react-native';
import { Dropdown } from 'react-native-material-dropdown';
import PropTypes from 'prop-types';
import { withStyles } from '@material-ui/core/styles';
import RadioButtons, { SegmentedControls } from 'react-native-radio-buttons';

export default class Widget extends Component {

    constructor(props) {
        super(props);


        let moreFruits = [{ label: 'Strawberry', value: 'Strawberry' },
        { label: 'Melon', value: 'Melon' },
        { label: 'Pineapple', value: 'Pineapple' },
        { label: 'Grapes', value: 'Grapes' },
        ];

        this.state = {
            selectedFruit: 'Pick your favorite fruit',
            reasonFruit: '',
            isFruitButtonClicked: 'no',
            selectedMoreFruitIndex: 0,
            moreFruits: moreFruits
        }
    }

    setSelectedOption(selectedOption) {
        var selectedMoreFruit = this.state.moreFruits.find(item => item.label == selectedOption.label);
        this.setState({ selectedMoreFruit: selectedMoreFruit })
    }

    renderOption(option, selected, onSelect, index) {
        const style = selected ? { backgroundColor: 'blue' } : { backgroundColor: 'red' };

        return (
            <TouchableWithoutFeedback onPress={onSelect} key={index}>
                <Text style={style}>{option.label}</Text>
            </TouchableWithoutFeedback>
        );
    }

    renderContainer(optionNodes) {
        return <View>optionNodes</View>;
    }

    setMoreFruitIndex(event) {
        this.setState({ selectedMoreFruitIndex: event.nativeEvent.selectedSegmentIndex })
    }


    render() {
        let data = [
            { label: 'Banana', value: 'Banana' },
            { label: 'Apple', value: 'Apple' },
            { label: 'Kiwi', value: 'Kiwi' }

        ];

        return (
            <View>

                <SegmentedControlIOS
                    values={['one', 'two']}
                    selectedIndex={this.state.selectedMoreFruitIndex}
                    onChange={(event) => this.setMoreFruitIndex(event)}
                />

                <Text>Selected option of react-native-radio-buttons: {this.state.selectedMoreFruit ? this.state.selectedMoreFruit.value : 'no fruit'}</Text>

                <SegmentedControls
                    options={this.state.moreFruits}
                    direction='row'
                    onSelection={option => this.setSelectedOption(option)}
                    selectedOption={this.state.selectedMoreFruit}
                    extractText={(option) => option.label}
                ></SegmentedControls>

                <Text style={{ fontWeight: 'bold' }}>Select favorite fruit then</Text>
                <Dropdown onChangeText={(val) => this.setState({ selectedFruit: val })} style={{ backgroundColor: 'aliceblue' }} data={data} />
                <Text>You selected: {this.state.selectedFruit}</Text>
                <Text></Text>


                <Text>Reason for fruit choice: {this.state.reasonFruit}</Text>
                <TextInput onChangeText={(val) => this.setState({ reasonFruit: val })} style={{ borderColor: 'black', borderRadius: 4, borderWidth: 1, backgroundColor: 'aliceblue' }} value={this.state.reasonFruit}></TextInput>

                <Text></Text>


                {/* <Button color="#841584" accessibilityLabel="Click this button!" onPress={(val) => this.setState({ isFruitButtonClicked: 'yes' })} title="Fruit button" />
                <Text>Is Fruit button clicked: {this.state.isFruitButtonClicked}</Text> */}

            </View >
        );
    }

    sayHello(val) {
        this.setState({ selectedFruit: 'You selected: ' + val })
    }


}
App.js
import React from 'react';
import { StyleSheet, Text, View } from 'react-native';
import Widget from './Widget'
import { Col, Row, Grid } from 'react-native-easy-grid';

export default class App extends React.Component {
  render() {
    return (
      // Try setting `alignItems` to 'flex-start'
      // Try setting `justifyContent` to `flex-end`.
      // Try setting `flexDirection` to `row`.
      <View style={{
        flex: 1,
        flexDirection: 'column',
        justifyContent: 'center',
        alignItems: 'stretch',
      }}>
        <View style={{ width: '80%', height: 50 }}>
          <Text style={{ fontSize: 18, flexWrap: 'wrap' }} >Welcome to the React Native apps demo!</Text>
        </View>
        <View style={{ height: 150 }}>
          <Widget />
        </View>
        <View style={{ height: 100 }} />
      </View>
    );
  }
}

const styles = StyleSheet.create({
  container: {
    flex: 1,
    justifyContent: 'center',
    flexDirection: 'column',
    backgroundColor: '#fff',
    alignItems: 'stretch'
  },
});
Lastly, remember to set the selected object in the correct manner, using the find method for example on the state variable. This to ensure we are pointing at the right selected object in the SegmentedControls control.
   setSelectedOption(selectedOption) {
        var selectedMoreFruit = this.state.moreFruits.find(item => item.label == selectedOption.label);
        this.setState({ selectedMoreFruit: selectedMoreFruit })
    }
Thursday, 22 November 2018
Displaying branch history in Git
I desired to have an easy branch log today. The following alias commands makes this easier. These go under the [alias] section in the .gitconfig file you are using in your repository.

latest = "!f() { echo "Latest \"${1:-11}\" commits accross all branches:"; git log  --abbrev-commit --date=relative --branches --all --pretty=format:'%Cred%h%Creset -%C(yellow)%d%Creset %s %Cgreen(%cr) %C(bold blue)<%an>%Creset%n' -n ${1:-11};  } ; f"
logbranch = "!f() { echo "Latest \"${1:-11}\" commits in current branch against master:"; git log master..${1:git branch}  --abbrev-commit --date=relative  --pretty=format:'%C(yellow)%h%Creset -%C(yellow)%d%Creset %s %Cgreen(%cr) %C(white blue bold)<%an>%Creset%n' -n ${1:-11};  } ; f"
git logbranch will display only the latest commit for the specified branch or defaulting to the current branch, defaulting to last 11 commits using a shell function.
Note that we compare against the master branch.
And we get the following sample output:
Sunday, 4 November 2018
Closing branches in Git
Git unlike Mercurial has no builtin support for closing branches. This leads to a proliferation of branches and running git branch -a to view remote branches or git branch will show ever more branches. Actually, closing a branch in Git can be supported through the use of tags. We decide to keep the tag for future use, so that we can use it to check out a new branch from this tag. Another way would of course be to just delete a brach local and/or remote, but that is not the same as closing a branch. Closing a branch in Mercurial still makes it possible to reopen it again for later work. Anyways, in this article, I will show two aliases which can be used to close a branch, either both local and remote or just remote.
Put the following into the [alias] section of your .gitConfig file:
closebranch = "!w() { echo Attempting to close local and remote branch: $1 Processing...; echo Checking the branch $1 out..; git checkout $1; echo Trying to create a new tag archive/$1; git tag archive/\"$1\"; git push origin archive/\"$1\"; echo Deleting the local branch $1; git branch -d $1;  echo Deleting the remote branch $1; git push origin --delete $1; echo Done. To restore the closed branch later, enter: git checkout -b MyNewBranch archive/\"$1\"; }; w"

closebranchpassive = "!w() { echo Attempting to close local and remote branch: $1 Processing...; echo Checking the branch $1 out..; git checkout $1; echo Trying to create a new tag archive/$1; git tag archive/\"$1\"; git push origin archive/$1; echo Deleting the local branch $1;   echo Deleting the remote branch $1;  echo Done. To restore the closed branch later, enter: git checkout -b MyNewBranch archive/\"$1\"; }; w"

closeremotebranch =  "!w() { echo Attempting to close remote branch: $1 Processing...; echo Checking the branch $1 out..; git checkout $1;  echo Trying to create a new tag archive/$1; git tag archive/\"$1\"; git push origin archive/\"$1\"; echo Deleting the remote branch $1; git push origin --delete $1; echo Done. To restore the closed branch later, enter: git checkout -b MyNewBranch archive/\"$1\"; }; w"
What we do here is the following:
- Check out the branch to close
- Tag this branch as archive/branchname
- Important - push the tag the remote e.g. origin in the provided aliased commands above
- (Delete the local branch)
- Delete the remote branch
- Display a friendly output message how to restore the branch later through a tag
git closebranch MyBranchToBeClosed
If you just want to close the remote branch and keep the local one, enter:
git closeremotebranch MyBranchToBeClosed
To restore the branch MyBranchToBeClosed (which now is actually closed!) later, just enter:
git checkout -b MyRestoredBranch archive/MyBranchToBeClosed
This lets you keep old branch around as tags and not proliferate the branch listings. We however have moved the branch(es) over to tags prefixed with archive/
I wish Git was simpler to use sometimes so we did not have to use such hacks, closing branches should be easy.
Wednesday, 17 October 2018
Working with Netsh http sslcert setup and SSL bindings through Powershell
I am working with a solution at work where I need to enable IIS Client certificates. I am not able to get past the "Provide client certificate" dialog, but
it is possible to alter the setup of SSL cert bindings on your computer through the Netsh command. This command is not in Powershell, but at the command line.
I decided to write some Powershell functions to be able to alter this setup atleast in an easier way. One annoyance with the netsh command is that you have to keep track of the
Application Id and Certificate hash values. Here, we can easier keep track of this through Powershell code.
The Powershell code to display and alter, modify, delete and and SSL cert bindings is as follows:

function Get-NetshSetup($sslBinding='0.0.0.0:443') {

$sslsetup = netsh http show ssl 0.0.0.0:443
#Get-Member -InputObject $sslsetup

$sslsetupKeys = @{}

foreach ($line in $sslsetup){
 if ($line -ne $null -and $line.Contains(': ')){

    $key = $line.Split(':')[0]
    $value = $line.Split(':')[1]
     if (!$sslsetupKeys.ContainsKey($key)){
       $sslsetupKeys.Add($key.Trim(), $value.Trim())
      }
    }
}


return $sslsetup

}

function Display-NetshSetup($sslBinding='0.0.0.0:443'){

 Write-Host SSL-Setup is:

 $sslsetup = Get-NetshSetup($sslBinding)

foreach ($key in $sslsetup){
 Write-Host $key $sslsetup[$key]
}
}

function Modify-NetshSetup($sslBinding='0.0.0.0:443', $certstorename='My',
  $verifyclientcertrevocation='disable', $verifyrevocationwithcachedcleintcertonly='disable',
  $clientCertNegotiation='enable', $dsmapperUsage='enable'){
  $sslsetup = Get-NetshSetup($sslBinding)

  echo Deleting sslcert netsh http binding for $sslBinding ...
  netsh http delete sslcert ipport=$sslBinding
  echo Adding sslcert netsh http binding for $sslBinding...
  netsh http add sslcert ipport=$sslBinding certhash=$sslsetup['Certificate Hash'] appid=$sslsetup['Application ID'] certstorename=$certstorename verifyclientcertrevocation=$verifyclientcertrevocation verifyrevocationwithcachedclientcertonly=$verifyrevocationwithcachedcleintcertonly clientcertnegotiation=$clientCertNegotiation dsmapperusage=$dsmapperUsage
  echo Done. Inspect output.
  Display-NetshSetup $sslBinding
}


function Add-NetshSetup($sslBinding, $certstorename, $certhash, $appid,
  $verifyclientcertrevocation='disable', $verifyrevocationwithcachedcleintcertonly='disable',
  $clientCertNegotiation='enable', $dsmapperUsage='enable'){

  echo Adding sslcert netsh http binding for $sslBinding...
  netsh http add sslcert ipport=$sslBinding certhash=$certhash appid=$appid  clientcertnegotiation=$clientCertNegotiation dsmapperusage=$dsmapperUsage certstorename=$certstorename verifyclientcertrevocation=$verifyclientcertrevocation verifyrevocationwithcachedclientcertonly=$verifyrevocationwithcachedcleintcertonly

  echo Done. Inspect output.
  Display-NetshSetup $sslBinding
}


#Get-NetshSetup('0.0.0.0:443');
Display-NetshSetup
#Modify-NetshSetup
Add-NetshSetup '0.0.0.0:443' 'MY' 'c0fe06da89bcb8f22da8c8cbdc97be413b964619' '{4dc3e181-e14b-4a21-b022-59fc669b0914}'
Display-NetshSetup
Saturday, 29 September 2018
Injecting text in html lists into lists using Sass
I wanted to test out if I could inject text via Sass style sheets to see if Sass could somehow support this. Of course, this is already possible in CSS using the nth-child selector and the ::after selector.
Here is a sample of the technique used in this article!
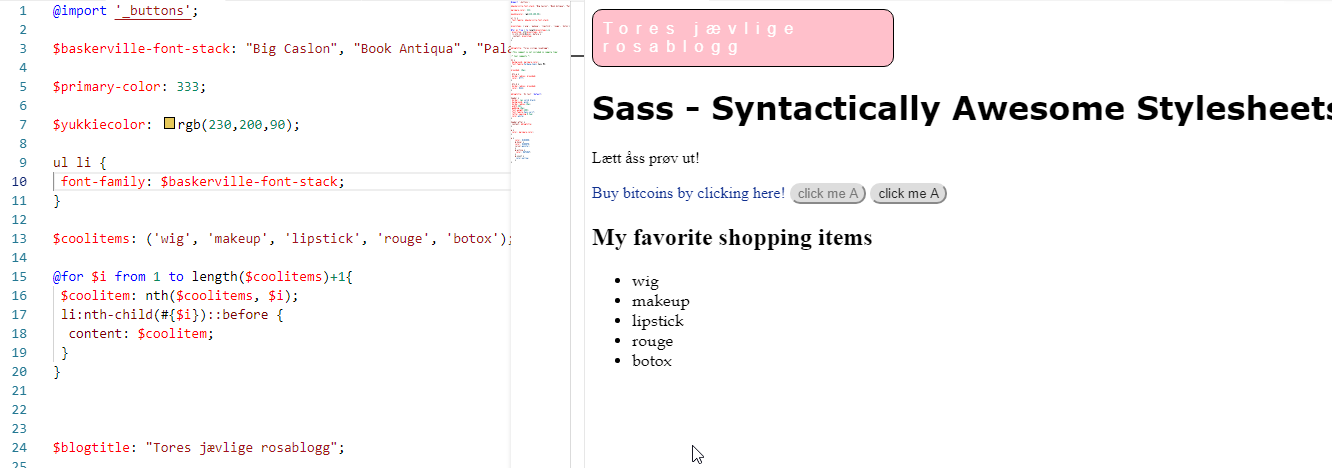 In Sass, however, we can inject text into a large list if we want. This means that the DOM must support the data you want to inject, if you want to inject for example five strings into an array of <ul>
of <li> items, you must also have five items of <li>
Anyways, this is what I ended up with:
In Sass, however, we can inject text into a large list if we want. This means that the DOM must support the data you want to inject, if you want to inject for example five strings into an array of <ul>
of <li> items, you must also have five items of <li>
Anyways, this is what I ended up with:
In Sass, however, we can inject text into a large list if we want. This means that the DOM must support the data you want to inject, if you want to inject for example five strings into an array of <ul>
of <li> items, you must also have five items of <li>
Anyways, this is what I ended up with:
$baskerville-font-stack: "Big Caslon", "Book Antiqua", "Palatino Linotype", Georgia, serif !default;

ul li {
 font-family: $baskerville-font-stack;
}

$coolitems: ('wig', 'makeup', 'lipstick', 'rouge', 'botox');

@for $i from 1 to length($coolitems)+1{
 $coolitem: nth($coolitems, $i);
 li:nth-child(#{$i})::before {
  content: $coolitem;
 }
}

$blogtitle: "Tores jævlige rosablogg";
We first declare an array in Sass using $coolitems: ('wig', 'makeup', 'lipstick', 'rouge', 'botox'). We then use the @for loop in Sass to get loop through this array. The syntax is:
@for $i from 1 to length($coolarray)+1 I had to use the +1 here in my sample.. Then we grab hold of the current item using the nth function, passing in the array $coolitems and specifying the index $i. Now that we have the
item of the $coolitems array, we can set the content CSS property of the n-th child and use the ::before (or ::after) selector. I tried to avoid using the +1 in the for loop, but then the last item of my array was not included in the list.
Note - the use of the #{$i} in the syntax above. This is called variable interpolation in Sass. It is similar syntax-wise to variable interpolation in shell scripts, actually. We use it so that we can refer to the variable $i inside the nth-child operator of CSS selector.
And the nth operator is as noted used to grab hold of the nth item of the Sass array.
And your HTML will then look like this:
  <ul>
            <li></li>
            <li></li>
            <li></li>
            <li></li>
            <li></li>
        </ul>
So you actually now have a list in HTML which is empty, but the values are injected through CSS! And Sass makes supporting such scenarios easier. Now why the heck would you want such a thing? I do not know,
I am more a backend developer than webdev frontend developer, it is though cool that you can load up data into the DOM using Sass and CSS
Thursday, 6 September 2018
Some handy Git tips - show latest commits and searching the log and more
This article will present some tips around Git and how you can add functionality for showing the latest commits and search the log.
I would like to search these aliased command to show you how they can ease your everyday use of Git from the commandline.
[alias]

glog = log --all --decorate --oneline --graph

glogf = log --all --decorate --oneline --graph --pretty=fuller

st = status

out      = !git fetch && git log FETCH_HEAD..

outgoing = !git fetch && git log FETCH_HEAD..

in       = !git fetch && git log ..FETCH_HEAD

incoming = !git fetch && git log ..FETCH_HEAD

com = "!w() { git commit --all --message \"$1\";  }; w"

undopush = "!w() { git revert HEAD~\"$1\"..HEAD;  }; w"

searchlog = "!f() { git --no-pager log --color-words --all --decorate --graph -i --grep \"$1\";  }; f"

branches =  branch --verbose --sort=-committerdate --format '%(HEAD)%(color:yellow)%(refname:short)%(color:reset) -%(color:red)%(objectname:short)%(color:reset) - %(contents:subject) -%(authorname) (%(color:green)%(committerdate:relative)%(color:reset))'

allbranches = "!g() { git branch --all --verbose --sort=-committerdate --format '%(HEAD) %(color:yellow)%(refname:short)%(color:reset) -%(color:red)%(objectname:short)%(color:reset) - %(contents:subject) -%(authorname) (%(color:green)%(committerdate:relative)%(color:reset))' --color=always | less -R;  }; g"
verify = fsck
clearlocal = clean -fd && git reset
stash-unapply = !git stash show -p | git apply -R
lgb = log --graph --pretty=format:'%Cred%h%Creset -%C(yellow)%d%Creset %s %Cgreen(%cr) %C(bold blue)<%an>%Creset%n' --abbrev-commit --date=relative --branches tree = log --graph --pretty=format:'%Cred%h%Creset -%C(yellow)%d%Creset %s %Cgreen(%cr) %C(bold blue)<%an>%Creset%n' --abbrev-commit --date=relative --branches alltree = log --graph --pretty=format:'%Cred%h%Creset -%C(yellow)%d%Creset %s %Cgreen(%cr) %C(bold blue)<%an>%Creset%n' --date=relative --branches --all
latest = "!f() { echo "Latest \"${1:-11}\" commits accross all branches:"; git log  --abbrev-commit --date=relative --branches --all --pretty=format:'%Cred%h%Creset -%C(yellow)%d%Creset %s %Cgreen(%cr) %C(bold blue)<%an>%Creset%n' -n ${1:-11};  } ; f"
add-commit = !git add -A && git commit
showconfig = config --global -e

[merge]
tool = kdiff3

[mergetool "kdiff3"]
cmd = \"C:\\\\Program Files\\\\KDiff3\\\\kdiff3\" $BASE $LOCAL $REMOTE -o $MERGED [core]
editor = 'c:/program files/sublime text 3/subl.exe' -w

[core]
editor = 'c:/Program Files/Sublime Text 3/sublime_text.exe'
The best aliases are how you set up Sublime Text 3 as the Git editor and also how you can show the latest commits. The latest commits use a parametrized shell function. I set the default value to 11 in this case, if you do not give a parameter. You can for example show the latest 2 commits by typing: git latest 2
latest = "!f() { echo "Latest \"${1:-11}\" commits accross all branches:"; git log --abbrev-commit --date=relative --branches --all --pretty=format:'%Cred%h%Creset -%C(yellow)%d%Creset %s %Cgreen(%cr) %C(bold blue)<%an>%Creset%n' -n ${1:-11}; } ; f"
Note the use of a shell function and also that we refer to the first parameter as ${1} i bash shell script, with a :-11 to set the first param as 11.
The syntax is ${n:-p} where n is the nth parameter (not starting with zero!) and p is the default value. A special syntax, but that is how bash works. Also note that a git alias with a shell function can do multiple functions, separated with semi-colon ;.
The searchlog alias / shell function is also handy:
searchlog = "!f() { git --no-pager log --color-words --all --decorate --graph -i --grep \"$1\"; }; f"
Also, multiple aliases here are similar to Mercurial's in and out commands to detect incoming pushed commits and outgoing local commits.
Happy Git-ing!
Tuesday, 21 August 2018
Creating a validation attribute for multiple enum values in C#
This article will present a validation attribute for multiple enum value in C#. In C#, generics is not supported in attributes.
The following class therefore specifyes the type of enum and provides a list of invalid enum values as an example of such an attribute.

using System;
using System.Collections.Generic;
using System.ComponentModel.DataAnnotations;

namespace ValidateEnums
{

    public sealed class InvalidEnumsAttribute : ValidationAttribute
    {

        private List<object> _invalidValues = new List<object>();


        public InvalidEnumsAttribute(Type enumType, params object[] enumValues)
        {
            foreach (var enumValue in enumValues)
            {
                var _invalidValueParsed = Enum.Parse(enumType, enumValue.ToString());
                _invalidValues.Add(_invalidValueParsed);
            }
        }

        public override bool IsValid(object value)
        {
            foreach (var invalidValue in _invalidValues)
            {
                if (Enum.Equals(invalidValue, value))
                    return false;
            }
            return true;
        }

    }

}
Let us make use of this attribute in a sample class.
 public class Snack
    {
        [InvalidEnums(typeof(IceCream), IceCream.None, IceCream.All )]
        public IceCream IceCream { get; set; }

    }
We can then test out this attribute easily in NUnit tests for example:
[TestFixture]
    public class TestEnumValidationThrowsExpected
    {

        [Test]
        [ExpectedException(typeof(ValidationException))]
        [TestCase(IceCream.All)]
        [TestCase(IceCream.None)]
        public void InvalidEnumsAttributeTest_ThrowsExpected(IceCream iceCream)
        {
            var snack = new Snack { IceCream = iceCream };
            Validator.ValidateObject(snack, new ValidationContext(snack, null, null), true);
        }

        [Test]
        public void InvalidEnumsAttributeTest_Passes_Accepted()
        {
            var snack = new Snack { IceCream = IceCream.Vanilla };
            Validator.ValidateObject(snack, new ValidationContext(snack, null, null), true);
            Assert.IsTrue(true, "Test passed for valid ice cream!");
        }
Sunday, 19 August 2018
ConfigurationManager for .Net Core
.Net Core is changing a lot of the underlying technology for .Net developers migrating to this development environment. System.Configuration.ConfigurationManager class is gone and web.config and app.config
files, which are XML-based are primrily replaced with .json files, at least in Asp.NET Core 2 for example.
Let's look at how we can implement a class to let you at least be able to read AppSettings in your applicationSettings.json file which can be later refined. This implementation is my first version.
using Microsoft.AspNetCore.Hosting;
using Microsoft.Extensions.Configuration;
using System.IO;
using System.Linq;

namespace WebApplication1
{

    public static class ConfigurationManager
    {

        private static IConfiguration _configuration;

        private static string _basePath;

        private static string[] _configFileNames;

        public static void SetBasePath(IHostingEnvironment hostingEnvironment)
        {
            _basePath = hostingEnvironment.ContentRootPath;
            _configuration = null;

            //fix base path
            _configuration = GetConfigurationObject();
        }

        public static void SetApplicationConfigFiles(params string[] configFileNames)
        {
            _configFileNames = configFileNames;
        }

        public static IConfiguration AppSettings
        {
            get
            {
                if (_configuration != null)
                    return _configuration;

                _configuration = GetConfigurationObject();
                return _configuration;
            }
        }

        private static IConfiguration GetConfigurationObject()
        {
            var builder = new ConfigurationBuilder()
                .SetBasePath(_basePath ?? Directory.GetCurrentDirectory());
            if (_configFileNames != null && _configFileNames.Any())
            {
                foreach (var configFile in _configFileNames)
                {
                    builder.AddJsonFile(configFile, true, true);
                }
            }
            else
                builder.AddJsonFile("appsettings.json", false, true);
            return builder.Build();

        }
    }
}
We can then easily get app settings from our config file:
string endPointUri = ConfigurationManager.AppSettings["EmployeeWSEndpointUri"];Sample appsettings.json file:
  {
  "Logging": {
    "IncludeScopes": false,
    "Debug": {
      "LogLevel": {
        "Default": "Warning"
      }
    },
    "Console": {
      "LogLevel": {
        "Default": "Warning"
      }
    }
  },
  "EmployeeWSEndpointUri": "https://someserver.somedomain.no/someproduct/somewcfservice.svc"

}
If you have nested config settings, you can refer to these using the syntax SomeAppSetting:SomeSubAppSetting, like "Logging:Debug:LogLevel:Default".
Creating a VM in Azure with Powershell core in Linux
This article will describe how a virtual machine in Azure from a command line in Linux. Powershell core will be used and I have tested this procedure using the Linux distribution MX-17 Horizon.
First, we will update the package list for APT (Advanced Packaging Tool), get the latest versions of cURL and apt-transport-https and add the
GPG key for the Microsoft repository for Powershell core. Then APT is once more updated and the package powershell is installed. The following script works on Debian-based distributions:

The last command is executed to check that the Powershell module is available. Type [Y] to allow the module installation in the first step. Next off, logging into the Azure Resource Manager. Type the following command in Powershell core: A complete list of available Linux images can be seen in the Azure marketplace or in the Microsoft Docs: Linux VMs in Azure overview
After installation, you can run the following cmdlet to clean up the resource group and all its resources, including the VM you created for testing.
A complete list of available Linux images can be seen in the Azure marketplace or in the Microsoft Docs: Linux VMs in Azure overview
After installation, you can run the following cmdlet to clean up the resource group and all its resources, including the VM you created for testing.
 sudo apt-get install
 sudo apt-get install curl apt-transport-https
 curl https://packages.microsoft.com/keys/microsoft.asc | sudo apt-key add -

 sudo sh -c 'echo "deb [arch=amd64] https://packages.microsoft.com/repos/microsoft-debian-jessie-prod jessie main" > /etc/apt/sources.list.d/microsoft.list'

 sudo apt-get update
 sudo apt-get install -y powershell
On my system however, I need to make use of Snap packages. This is because MX-Horizon fails to install powershell due to restrictions on libssl1.0 and libicu52.
Anyways this route let me start up Powershell on MX-17 Horizon:
 sudo apt-get install snapd
 sudo snap install powershell-preview --classic
 sudo snap run powershell-preview
Logging into Azure RM account
Running powershell-preview allows you to both run Powershell commands such as Get-ChildItem ("ls") and Unix tools such as ls (!) from the Powershell command line. We will first install the Powershell module AzureRM.NetCore inside the Powershell session, which is running.
 Install-Module AzureRM.Netcore
 Get-Command -Module AzureRM.Compute.Netcore
The last command is executed to check that the Powershell module is available. Type [Y] to allow the module installation in the first step. Next off, logging into the Azure Resource Manager. Type the following command in Powershell core:
Login-AzureRMAccount
Running this command will prompt a code and tell you to open up a browser window and log on to: https://microsoft.com/devicelogin
Then you log in to your Azure account and if you are successfully logged in, your Powershell core session is authenticated and you can access your Azure account and its resources!
Creating the Virtual machine in Azure
Creating the virtual machine is done in several steps. The script below is to be saved into a Powershell script file, forexample AzureVmCreate.ps1. There are many steps involved into establishing an installation of a VM in Azure. We will in this sample set up all the necessities to get an Ubuntu Server LTS. If you already have got for example a resource group in Azure, the script below can use this resource group instead of creating a new one. The list of steps are as follows to create a Linux VM in Azure:- Create a resource group
- Create a subnet config
- Create a virtual network, set it up with the subnet config
- Create a public IP
- Create a security rule config to allow port 22 (SSH)
- Create a network security group nsg and add in the security rule config
- Create a network interface card nic and associate it with the public ip and the nsg
- Create a VM config and set the operating system, OS image and nic
- Create a VM config's SHH public key config
- Create a VM - Virtual Machine in Azure !
param([string]$resourceGroupName,
       [string]$resourceGroupLocation,
       [string]$vmComputerName,
       [string]$vmUser,
       [string]$vmUserPassword,
       [string]$virtualNetworkName)
#Write-Host $resourceGroupName
#Write-Host $resourceGroupLocation
#Write-Host $vmComputerName
#Write-Host $vmUser
#Write-Host $vmUserPassword

# Definer user name and blank password
$securePassword = ConvertTo-SecureString ' ' -AsPlainText -Force
$cred = New-Object System.Management.Automation.PSCredential ("azureuser", $securePassword)

New-AzureRmResourceGroup -Name $resourceGroupName -Location $resourceGroupLocation

$subnetConfig = New-AzureRmVirtualNetworkSubnetConfig -Name default -AddressPrefix 10.0.0.0/24

$virtualNetwork = New-AzureRMVirtualNetwork -ResourceGroupName $resourceGroupName -Name `
$virtualNetworkName -AddressPrefix 10.0.0.0/16 -Location $resourceGroupLocation `
-Subnet $subnetConfig

Write-Host "Subnet id: " $virtualNetwork.Subnets[0].Id

# Create a public IP address and specify a DNS name
$pip = New-AzureRmPublicIpAddress -ResourceGroupName $resourceGroupName -Location $resourceGroupLocation `
  -Name "mypublicdns$(Get-Random)" -AllocationMethod Static -IdleTimeoutInMinutes 4

# Create an inbound network security group rule for port 22
$nsgRuleSSH = New-AzureRmNetworkSecurityRuleConfig -Name myNetworkSecurityGroupRuleSSH  -Protocol Tcp `
  -Direction Inbound -Priority 1000 -SourceAddressPrefix * -SourcePortRange * -DestinationAddressPrefix * `
  -DestinationPortRange 22 -Access Allow

# Create a network security group
$nsg = New-AzureRmNetworkSecurityGroup -ResourceGroupName $resourceGroupName -Location $resourceGroupLocation `
  -Name myNetworkSecurityGroup -SecurityRules $nsgRuleSSH

# Create a virtual network card and associate with public IP address and NSG
$nic = New-AzureRmNetworkInterface -Name myNic -ResourceGroupName $resourceGroupName -Location $resourceGroupLocation `
  -SubnetId $virtualNetwork.Subnets[0].Id -PublicIpAddressId $pip.Id -NetworkSecurityGroupId $nsg.Id


# Create a virtual machine configuration
$vmConfig = New-AzureRmVMConfig -VMName $vmComputerName -VMSize Standard_D1 | `
Set-AzureRmVMOperatingSystem -Linux -ComputerName $vmComputerName -Credential $cred -DisablePasswordAuthentication | `
Set-AzureRmVMSourceImage -PublisherName Canonical -Offer UbuntuServer -Skus 14.04.2-LTS -Version latest | `
Add-AzureRmVMNetworkInterface -Id $nic.Id


# Configure SSH Keys
$sshPublicKey = Get-Content "$HOME/.ssh/id_rsa.pub"
Add-AzureRmVMSshPublicKey -VM $vmconfig -KeyData $sshPublicKey -Path "/home/azureuser/.ssh/authorized_keys"

# Create a virtual machine
New-AzureRmVM -ResourceGroupName $resourceGroupName -Location $resourceGroupLocation -VM $vmConfig
We can then instantiate a new VM in Azure running the script above, which will create a standard D1 blade server in Azure
with approx. 3,5 GB RAM and 30 GB disk space with Ubuntu Server LTS latest from the publisher Canonical by calling this script
like for example:
./AzureVmCreate.ps1 -resourceGroupName "SomeResourceGroup" -resourceGroupLocation "northcentralus" "SomeVmComputer" -vmUser "adminUser" -password "s0m3CoolPassw0rkzzD" -virtualNetworkName "SomeVirtualNetwork"
After the VM is created, which for me took about 5 minutes time before the VM was up and running in Azure, you can access it by visiting the Azure portal at
https://portal.azure.com
You can then take notice of the public IP adress that the script in this article created and connect with : ssh azureuser@ip_address_to_linux_VM_you_just_created_in_Azure!
The following images shows me logging into the Ubuntu Server LTS Virtual Machine that was created with the Powershell core script in this article!
Remove-AzureRmResourceGroup -Name myResourceGroup
Thursday, 9 August 2018
Detect USB drives in a WPF application

We can use the class System.IO.DriveInfo to retrieve all the drives on the system and look for drives where the DriveType is Removable. In addition, the removable drive (USB usually) must be ready, which is accessible as the property IsReady. First off, we define a provider to retrieve the removable drives:
    using System.Collections.Generic;
    using System.IO;
    using System.Linq;

    namespace TestPopWpfWindow
    {

    public static class UsbDriveListProvider
    {


        public static IEnumerable<DriveInfo> GetAllRemovableDrives()
        {
            var driveInfos = DriveInfo.GetDrives().AsEnumerable();
            driveInfos = driveInfos.Where(drive => drive.DriveType == DriveType.Removable);
            return driveInfos;
        }

    }
}
Let us use the MVVM pattern also, so we define a ViewModelbase class, implementing INotifyPropertyChanged.
using System.ComponentModel;

namespace TestPopWpfWindow
{

    public class ViewModelBase : INotifyPropertyChanged
    {

        public event PropertyChangedEventHandler PropertyChanged;

        public void RaisePropertyChanged(string propertyName)
        {
            if (PropertyChanged != null)
                PropertyChanged(this, new PropertyChangedEventArgs(propertyName));
        }


    }
}
It is also handy to have an implemetation of ICommand:
    using System;
    using System.Windows.Input;

    namespace TestPopWpfWindow
    {

        public class RelayCommand : ICommand
        {

            private Predicate<object> _canExecute;

            private Action<object> _execute;


            public RelayCommand(Predicate<object> canExecute, Action<object> execute)
            {
                _canExecute = canExecute;
                _execute = execute;
            }

            public bool CanExecute(object parameter)
            {
                return _canExecute(parameter);
            }

            public event EventHandler CanExecuteChanged;

            public void Execute(object parameter)
            {
                _execute(parameter);
            }

        }
    }
We also set the DataContext of MainWindow to an instance of a demo view model defined afterwards:
namespace TestPopWpfWindow
{

    /// <summary>
    /// Interaction logic for MainWindow.xaml
    /// </summary>
    public partial class MainWindow : Window
    {

        public MainWindow()
        {
            InitializeComponent();
            DataContext = new UsbDriveInfoDemoViewModel();
        }

    }
}
We then define the view model itself and use System.Management.ManagementEventWatcher to look for changes in the drives mounted onto the system.
  using System;
    using System.Collections.Generic;
    using System.Diagnostics;
    using System.IO;
    using System.Management;
    using System.Windows;
    using System.Windows.Input;

    namespace TestPopWpfWindow
    {

        public class UsbDriveInfoDemoViewModel : ViewModelBase, IDisposable
        {

            public UsbDriveInfoDemoViewModel()
            {
                DriveInfos = new List<DriveInfo>();
                ReloadDriveInfos();
                RegisterManagementEventWatching();
                TargetUsbDrive = @"E:<";
                AccessCommand = new RelayCommand(x => true, x => MessageBox.Show("Functionality executed."));
            }

            public int UsbDriveCount { get; set; }

            private string _targetUsbDrive;

            public string TargetUsbDrive
            {
                get { return _targetUsbDrive; }
                set
                {
                    if (_targetUsbDrive != value)
                    {
                        _targetUsbDrive = value;
                        RaisePropertyChanged("TargetUsbDrive");
                        RaisePropertyChanged("DriveInfo");
                    }
                }
            }

            public ICommand AccessCommand { get; set; }

            private void ReloadDriveInfos()
            {
                var usbDrives = UsbDriveListProvider.GetAllRemovableDrives();

                Application.Current.Dispatcher.Invoke(() =>
                {
                    DriveInfos.Clear();

                    foreach (var usbDrive in usbDrives)
                    {
                        DriveInfos.Add(usbDrive);
                    }
                    UsbDriveCount = DriveInfos.Count;
                    RaisePropertyChanged("UsbDriveCount");
                    RaisePropertyChanged("DriveInfos");
                });
            }

            public List<DriveInfo> DriveInfos { get; set; }

            private ManagementEventWatcher _watcher;

            private void RegisterManagementEventWatching()
            {
                _watcher = new ManagementEventWatcher();
                var query = new WqlEventQuery("SELECT * FROM Win32_VolumeChangeEvent");
                _watcher.EventArrived += watcher_EventArrived;
                _watcher.Query = query;
                _watcher.Start();
            }

            private void watcher_EventArrived(object sender, EventArrivedEventArgs e)
            {
                Debug.WriteLine(e.NewEvent);
                ReloadDriveInfos();
            }


            public void Dispose()
            {
                if (_watcher != null)
                {
                    _watcher.Stop();
                    _watcher.EventArrived -= watcher_EventArrived;
                }
            }

        }

    }
We also define a WPF multi-converter next to enable the button:
using System;
using System.Collections.Generic;
using System.Globalization;
using System.IO;
using System.Linq;
using System.Windows.Data;

namespace TestPopWpfWindow
{

    public class UsbDriveAvailableEnablerConverter : IMultiValueConverter
    {

        public object Convert(object[] values, Type targetType, object parameter, CultureInfo culture)
        {
            if (values == null || values.Count() != 2)
                return false;

            var driveInfos = values[1] as List<DriveInfo>;
            var targetDrive = values[0] as string;
            if (driveInfos == null || !driveInfos.Any() || string.IsNullOrEmpty(targetDrive))
                return false;
            return driveInfos.Any(d => d.IsReady && d.Name == targetDrive);
        }


        public object[] ConvertBack(object value, Type[] targetTypes, object parameter, CultureInfo culture)
        {
            throw new NotImplementedException();
        }
    }
}
And we define a GUI to test this code:
<Window x:Class="TestPopWpfWindow.MainWindow"
        xmlns="http://schemas.microsoft.com/winfx/2006/xaml/presentation"
        xmlns:x="http://schemas.microsoft.com/winfx/2006/xaml"
        xmlns:local="clr-namespace:TestPopWpfWindow"
        Title="MainWindow" Height="350" Width="525">

    <Window.Resources>

        <Style x:Key="usbLabel" TargetType="Label">
            <Style.Triggers>
                <DataTrigger Binding="{Binding IsReady}" Value="False">
                    <Setter Property="Background" Value="Gray"></Setter>
                </DataTrigger>
                <DataTrigger Binding="{Binding IsReady}" Value="True">
                    <Setter Property="Background" Value="Green"></Setter>
                </DataTrigger>
            </Style.Triggers>
        </Style>

        <local:UsbDriveAvailableEnablerConverter x:Key="usbDriveAvailableEnablerConverter"></local:UsbDriveAvailableEnablerConverter>

    </Window.Resources>


    <Grid>
        <Grid.RowDefinitions>
            <RowDefinition Height="Auto"></RowDefinition>
            <RowDefinition Height="Auto"></RowDefinition>
            <RowDefinition Height="Auto"></RowDefinition>

        </Grid.RowDefinitions>

        <StackPanel Orientation="Vertical">
            <TextBlock Text="USB Drive-detector" FontWeight="DemiBold" HorizontalAlignment="Center" FontSize="14" Margin="2"></TextBlock>
            <TextBlock Text="Removable drives on the system" FontWeight="Normal" HorizontalAlignment="Center" Margin="2"></TextBlock>
            <TextBlock Text="Drives detected:" FontWeight="Normal" HorizontalAlignment="Center" Margin="2"></TextBlock>
            <TextBlock Text="{Binding UsbDriveCount, UpdateSourceTrigger=PropertyChanged}" FontWeight="Normal" HorizontalAlignment="Center" Margin="2"></TextBlock>

            <ItemsControl Grid.Row="0" ItemsSource="{Binding DriveInfos, UpdateSourceTrigger=PropertyChanged}"
                          Width="100" BorderBrush="Black" BorderThickness="1">
                <ItemsControl.ItemTemplate>
                    <DataTemplate>
                        <StackPanel Orientation="Vertical">
                            <Label Style="{StaticResource usbLabel}" Width="32" Height="32" FontSize="18" Foreground="White" Content="{Binding Name}">
                            </Label>
                        </StackPanel>

                    </DataTemplate>
                </ItemsControl.ItemTemplate>
            </ItemsControl>
        </StackPanel>

        <Button Grid.Row="1" Height="24" Width="130" VerticalAlignment="Top" Margin="10" Content="Access functionality" Command="{Binding AccessCommand}">
            <Button.IsEnabled>
                <MultiBinding Converter="{StaticResource usbDriveAvailableEnablerConverter}">
                    <MultiBinding.Bindings>
                        <Binding Path="TargetUsbDrive"></Binding>
                        <Binding Path="DriveInfos"></Binding>
                    </MultiBinding.Bindings>
                </MultiBinding>
            </Button.IsEnabled>
        </Button>

        <StackPanel Grid.Row="2" Orientation="Horizontal" HorizontalAlignment="Center">
            <TextBlock Margin="2" Text="Target this USB-drive:"></TextBlock>
            <TextBox Margin="2" Text="{Binding TargetUsbDrive, UpdateSourceTrigger=LostFocus}" Width="100"></TextBox>
        </StackPanel>

    </Grid>

</Window>
I have now provided the Visual Studio 2013 solution with the code above available for download here:
Download VS 2013 Solution with source code above
Subscribe to:
Comments (Atom)