Saturday 17 June 2023

Generic factory in C#

I tested out methods for building a simple generic factory in C#. This is using reflection to instantiate objects. It shows how we can combine some central methods in reflection to instantiate objects from types, they either being non-generic types, generic types which are either closed generic types or open generic types :
  • Activator.CreateInstance to instantiate the objects
  • MakeGenericType to close the generic type, which must be an open generic type
  • IsGenericTypeDefinition to check if the type is an open generic type
Consider this code where we attempt to make a generic type from an already closed type, it gives an InvalidOperationException telling us that we must check that IsGenericTypeDefinition is true on the type.

var someconcrete = typeof(Dictionary<string, int>);
var foo = someconcrete.MakeGenericType();

The Generic factory could of course be complex, support a multitude of scenarios, including resolving constructor arguments and their dependencies. This is more just demonstration code how you could instantiate objects via either closed or open generics in .NET. Observe that Activator.CreateInstance got a lot of different possible overloads.

Generic factory pattern in C# using reflection - simple approach


public static class GenericFactory {

	public static object CreateInstance<T>(Type type){		
		if (type.IsGenericTypeDefinition){
			var closedGenericType = type.MakeGenericType(typeof(T));	
			return Activator.CreateInstance(closedGenericType);			
		}		
		return Activator.CreateInstance<T>();	
	}

	public static TReturn CreateInstance<T, TReturn>(Type type)
	{
		if (type.IsGenericTypeDefinition)
		{
			var closedGenericType = type.MakeGenericType(typeof(T));
			return (TReturn) Activator.CreateInstance(closedGenericType);
		}
		return (TReturn) Activator.CreateInstance<TReturn>();
	}

	public static TReturn CreateInstance<T1, T2, TReturn>(Type type, params object[] args)
	{
		if (type.IsGenericTypeDefinition)
		{
			var closedGenericType = type.MakeGenericType(typeof(T1), typeof(T2));
			return (TReturn)Activator.CreateInstance(closedGenericType, args);
		}
		return (TReturn)Activator.CreateInstance(type, args);
	}

	public static object CreateInstance(Type type, Type[]genericTypeArguments, params object[] args)
	{
		if (type.IsGenericTypeDefinition)
		{
			var closedGenericType = type.MakeGenericType(genericTypeArguments);
			return Activator.CreateInstance(closedGenericType, args);
		}
		return Activator.CreateInstance(type, args);
	}

	public static TReturn CreateInstance<TReturn>(Type type, Type[] genericTypeArguments, params object[] args)
	{
		if (type.IsGenericTypeDefinition)
		{
			var closedGenericType = type.MakeGenericType(genericTypeArguments);
			return (TReturn) Activator.CreateInstance(closedGenericType, args);
		}
		return (TReturn) Activator.CreateInstance(type, args);
	}

	public static TReturn CreateInstance<T, TReturn>(Type type, params object[] args)
	{
		if (type.IsGenericTypeDefinition)
		{
			var closedGenericType = type.MakeGenericType(typeof(T));
			return (TReturn)Activator.CreateInstance(closedGenericType, args);
		}
		return (TReturn)Activator.CreateInstance(type, args);
	}

	public static T CreateInstance<T>(){
		return (T) Activator.CreateInstance(typeof(T));
	}
	
	public static T CreateInstance<T>(params object[] args){
		return (T) Activator.CreateInstance(typeof(T), args);
	}
	
	
}


Next up, some sample code to test out these helper methods. The code shows that there really is few methods involved to create instances from open generic types or closed generic types. The three mentioned methods and properties at the top of this article.

Sample code using Generic factory


void Main()
{
	
	//var someconcrete = typeof(Dictionary<string, int>);
	//var foo = someconcrete.MakeGenericType();
	
	var redCar = GenericFactory.CreateInstance<Car>();
	redCar.Color = Colors.Red;
	redCar.Model = "A5";
	redCar.Make = "Audi";
	redCar.Dump("The red car was created using default constructor and reflection with Activator.CreateInstance");
	
	var blueCar = GenericFactory.CreateInstance<Car>("Tesla", "Model X", Colors.Blue);
	blueCar.Dump("The blue car was created using constructor arguments matching the closest constructor with reflection and Activator.CreateInstance");
	
	var carPool = GenericFactory.CreateInstance<Car>(typeof(VehiclePool<>));
	carPool.Dump("Empty carpool which is of type object was created with reflection passing in an open generic type and specifying the type to close the generic with using MakeGenericType");

	var carPool3 = GenericFactory.CreateInstance<Car, VehiclePool<Car>>(typeof(VehiclePool<>));
    carPool3.AddVechicle(1, redCar);
	carPool3.AddVechicle(2, blueCar);
	carPool3.Dump("CarPool casted to specific type VehiclePool<Car> contains these cars - it was created using open generic type specifying a type to close the generic with with MakeGenericType:");
	
	var dictionaryOfIntAndString = GenericFactory.CreateInstance<int, string, Dictionary<int, string>>(typeof(Dictionary<,>));

	dictionaryOfIntAndString[0] = "Audi A5";
	dictionaryOfIntAndString[1] = "Audi A8";
	dictionaryOfIntAndString[2] = "Audi RS8";
	
	dictionaryOfIntAndString.Dump("Dictionary<int,string> contains these cars. It was constructed using an open generic type Dictionary<,> and passing in the generic type arguments of int and string using Activator.CreateInstance with MakeGenericType");
		
}
  
    
The sample code uses these types :

Sample types using Generic factory


public class VehiclePool<T> : IPool<T>{
	private Dictionary<int, T> _pool = new Dictionary<int, T>();
	
	public Dictionary<int, T> Pool {
		get {
			return _pool;
		}
	}
	public VehiclePool()
	{
	}

	public void AddVechicle(int vehicleId, T vehicle)
	{
		if (!_pool.ContainsKey(vehicleId)){
			_pool.Add(vehicleId, vehicle);
		}
	}

	public T GetVehicle(int vehicleId)
	{
		if (_pool.ContainsKey(vehicleId)){
			return _pool[vehicleId];
		}
		return default(T);
	}

	public void RemoveVehicle(int vehicleId)
	{
		if (_pool.ContainsKey(vehicleId))
		{
			_pool.Remove(vehicleId);
		}
		else
		{
			throw new ArgumentException($"Vehicle with {vehicleId} does not exist");
		}
	}
}

public interface IPool<T> {
	void AddVechicle(int vehicleId, T vehicle);
	void RemoveVehicle(int vehicleId);
	T GetVehicle(int vehicleId);
}

public class Car {
	
	public string Model { get; set; }
	public string Make { get; set; }
	public int WheelCount { get; set; } = 4;
	public Color Color { get; set; }
	
	public Car()
	{		
	}
	
	public Car(string make, string model, Color color)
	{
		Make = make;
		Model = model;
		Color = color;
	}
}


Here is the output.

Sample code using Generic factory


Note that Activator.CreateInstance returns object, so if you want a strongly typed object, you should specify the return type, TReturn in the code sample above. You could consider using dynamic here, but then you loose the Intellisense if you want to avoid unboxing the object returned to a specific type. Then we would use a very basic method first like this:


public static T CreateInstance<T>(params object[] args){
		return (T) Activator.CreateInstance(typeof(T), args);
}
 
 
Using dynamic we can ignore casting the object to a specific type and continue using late binding, which we use already with reflection.

    dynamic redCar = GenericFactory.CreateInstance(typeof(Car));
	redCar.Color = Colors.Red;
	redCar.Model = "A5";
	redCar.Make = "Audi";
	redCar.Dump("The red car was created using default constructor and reflection with Activator.CreateInstance");


Thursday 18 May 2023

Animations in Blazor


I tested out animations in Blazor today, using the AOS - Animate on Scroll - library. I will use Blazor WASM for this. The sample code in this article can be cloned from my GitHub repo here: https://github.com/toreaurstadboss/BlazorAnimateSample This library is very easy to set up for Blazor. First off, go to the AOS website for installation instructions. AOS Github Pages On this site, copy the links to the CSS and Js file from the CDN. But note that I instead used VS 2022 and choose:
Add=>Client-side Library


The benefit of using this way of adding Aos is that the CSS and Js is installed into lib folders and you can drag the two files into the <head> section and <script> section inside body tag at the bottom of the index.html file. You set up AOS using the init method. You can either define a startEvent or not, it should default to event DOMContentLoaded i.e. when the element is displayed, the animation is started. The use of AOS and init method is explained in the GitHub repo for AOS: https://github.com/michalsnik/aos I set up AOS like this in index.html:
 

    <script src="_framework/blazor.webassembly.js"></script>
    <script src="js/animate.js"></script>
    <script src="lib/aos/aos.js"></script>
    <script>
        AOS.init({
            easing: 'ease-in-out',
            //startEvent: 'custom'
        });
    </script>
    
 
You can set the startEvent to 'custom' for example if you want to disable automatically loading the start of animations as soon as the element is scrolled into view or displayed in some other control manner. (actually you could set it to 'myEvent' here or some other gibberish value, to turn off automatically loading animations. Over to the file animate.js which will be used by the Animation component in Blazor (will be described later in this article).


function RegisterAnimationStartupTrigger(wrapperAnimationElementId, triggerElementId, triggerEventId) {
    //debugger
    if (event != null && event.target != null && event.target != undefined && event.target.closest) {
        var closestParentDiv = event.target.closest('div');
        if (closestParentDiv != null && closestParentDiv.id == wrapperAnimationElementId) {

            //sub elements of the wrapper div should not trigger animation, to avoid AOS running animation again
            return;
        }
    }
    
    var elem = document.getElementById(wrapperAnimationElementId);
    if (elem == null || elem == undefined) {
        return;
    }
    var triggerElement = document.getElementById(triggerElementId);
    if (triggerElement == null || triggerElement == undefined) {
        return;
    }

    elem.classList.remove('aos-init'); //remove aos-animate class to avoid auto loading animation on scroll
    elem.classList.remove('aos-animate'); //remove aos-animate class to avoid auto loading animation on scroll

    triggerElement.addEventListener(triggerEventId, function () { AddAosAnimateCssClass(elem, triggerEventId, wrapperAnimationElementId); }); //remove aos-animate class to avoid auto loading animation on scroll
}

function AddAosAnimateCssClass(elem, triggerEventId, wrapperAnimationElementId) {
    //debugger
    if (event != null && event.target != null && event.target != undefined && event.target.closest) {
        var closestParentDiv = event.target.closest('div');
        if (closestParentDiv != null && closestParentDiv.id == wrapperAnimationElementId) {

            //sub elements of the wrapper div should not trigger animation, to avoid AOS running animation again
            return;
        }
    }
    if (elem == null || elem == undefined) {
        return;
    }

    elem.classList.remove('aos-init');
    elem.classList.remove('aos-animate');

    if (triggerEventId.toLowerCase() == 'change') {
        if (!event.target.checked) {
            return; //in case this is a checkbox, only trigger on checked state
        }
    }

    setTimeout(function () {
        elem.classList.add('aos-init');
        elem.classList.add('aos-animate');
    }, 500);
}

function RestartAosEventToImplicitEventDomContentLoaded() {
    AOS.init({
        easing: 'ease-in-out',
        startEvent: 'DOMContentLoaded'
    });
}

function DisableAosEventToImplicitEventDomContentLoaded() {
    AOS.init({
        easing: 'ease-in-out',
        startEvent: 'MyCustomEvent'
    });
}
 
 
We set up some helper methods here to be able control playing animations on demand. This is not required however, it was just an experiment from my side to see how you could select an element in the DOM and a event for that element (DOM event) to control how to start the animation. The Animation.razor component looks like this, with its code behind.


@inject IJSRuntime JsRuntime
<div id="@_wrapperDivUniqueId" data-aos="@SelectedAnimation.GetDisplayName()" data-aos-delay="@Delay" data-aos-duration="@Duration">
  @ChildContent
</div>

@code {
    private string _wrapperDivUniqueId = $"wrapperDiv_{Guid.NewGuid().ToString("N")}";

    [Parameter]
    public RenderFragment? ChildContent { get; set; }

    /// <summary>
    /// Duration must be set between 50 to 3000 ms, see defined limit here : https://github.com/michalsnik/aos
    /// </summary>
    [Parameter]
    public int Duration { get; set; } = 1000;

    /// <summary>
    /// Delay must be set between 0 to 3000 ms, see defined limit here: https://github.com/michalsnik/aos
    /// </summary>
    [Parameter]
    public int Delay { get; set; } = 50;

    /// <summary>
    /// Animation to use. Use name list defined in Animations. See here: <see cref="AnimationNames" /> for a list of supported Animations.
    /// </summary>
    [Parameter]
    public AnimationNames SelectedAnimation { get; set; } = AnimationNames.Fade;

    /// <summary>
    /// DOM id of the element that will trigger the animation. If not set, the animation will happed as default, when element scrolls into view according to AOS standard
    /// </summary>
    [Parameter]
    public string? TriggerElementId { get; set; }

    /// <summary>
    /// DOM event for the element that will trigger the animation. See https://www.w3schools.com/jsref/dom_obj_event.asp for a list of DOM events. If not set, the animation will happen as default, when the element scrolls into view according to AOS standard.
    /// </summary>
    [Parameter]
    public string? TriggerEventId { get; set; }

    protected async override Task OnAfterRenderAsync(bool firstRender)
    {
        if (!string.IsNullOrWhiteSpace(TriggerElementId) && !string.IsNullOrWhiteSpace(TriggerEventId))
        {
            //turn off automatic animation on scroll for the element

            await JsRuntime.InvokeAsync<string>("RegisterAnimationStartupTrigger", new[] {
                _wrapperDivUniqueId, TriggerElementId, TriggerEventId });
        }
    }


    protected override void OnParametersSet()
    {
        if (Duration < 50)
        {
            Duration = 50;
        } 
        else if (Duration > 3000)
        {
            Duration = 3000;
        }
        if (Delay < 0)
        {
            Delay = 0;
        }
        else if (Delay > 3000)
        {
            Delay = 3000;
        }
        if (string.IsNullOrWhiteSpace(SelectedAnimation.GetDisplayName()))
        {
            SelectedAnimation = AnimationNames.Fade;
        }       
    }

}


In the component above, we use the parameter ChildContent which is a RenderFragment? which is used in the razor markup. We wrap a div and generate a unique id which is used in Javascript to control the on demand coupling of starting the animation. In many cases, you could just use the default DOMContentLoaded if you want to just play the animation when the element is displayed. Here is how you use the Animation component in an example component:
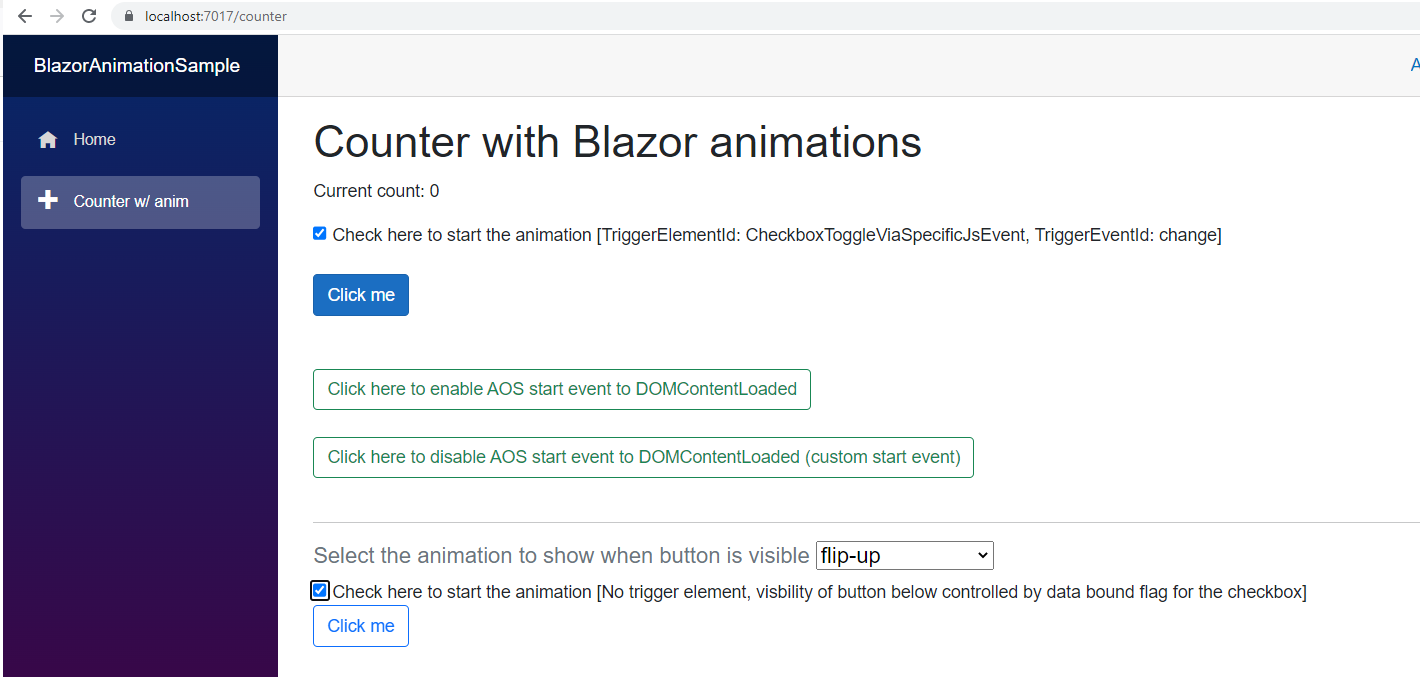
 
 
@page "/counter"
@inject IJSRuntime JS

<PageTitle>Counter</PageTitle>

<h1>Counter with Blazor animations</h1>

<p role="status">Current count: @currentCount</p>

<input type="checkbox" id="CheckboxToggleViaSpecificJsEvent" />
    Check here to start the animation [TriggerElementId: CheckboxToggleViaSpecificJsEvent, TriggerEventId: change]
<br />
<br />
<Animation Duration="1000" SelectedAnimation="@AnimationNames.Fade" TriggerElementId="CheckboxToggleViaSpecificJsEvent" TriggerEventId="change">
    <button class="btn btn-primary" @onclick="IncrementCount">Click me</button>
</Animation>
<br />
<br />


<button @onclick="AOSRestartStartEvent" class="btn btn-outline-success">
    Click here to enable AOS start event to DOMContentLoaded
</button>
<br /><br />

<button @onclick="AOSCustomStartEvent" class="btn btn-outline-success">
    Click here to disable AOS start event to DOMContentLoaded (custom start event)
</button>
<br />
<br />

<hr />

<label>
    <h5 class="text-muted">
        Select the animation to show when button is visible
        <InputSelect @bind-Value="SelectedAnimation">
            @foreach (var item in Enum.GetValues(typeof(AnimationNames)).Cast<AnimationNames>())
            {
                <option value="@item">@item.GetDisplayName()</option>                
            }
        </InputSelect>
    </h5>
</label>

<br />

<label>  
 <InputCheckbox @bind-Value="@showAnotherCurrentCountBtn" />
   Check here to start the animation [No trigger element, visbility of button below controlled by data bound flag for the checkbox]
</label>

@if (showAnotherCurrentCountBtn){
    <Animation Duration="1500" SelectedAnimation="@SelectedAnimation" Delay="50">
        <button class="btn btn-outline-primary" @onclick="IncrementCount">Click me</button>
    </Animation>
}
<br />
<br />

@code {
    private int currentCount = 0;
    private bool showAnotherCurrentCountBtn = false;

    private AnimationNames SelectedAnimation = AnimationNames.Fade;


    private void IncrementCount()
    {
        currentCount++;
    }

    private async Task AOSRestartStartEvent()
    {
        await JS.InvokeAsync<string>("RestartAosEventToImplicitEventDomContentLoaded");
    }

    private async Task AOSCustomStartEvent()
    {
        await JS.InvokeAsync<string>("DisableAosEventToImplicitEventDomContentLoaded");
    }

} 
 
 
The AnimationNames is an enum which allows you to set one of the pre-defined animations in AOS. It is possible to define a custom (CSS-based) animation to use with AOS too, I might look into that in another article later on.
 
 using System.ComponentModel.DataAnnotations;

namespace BlazorAnimationSample.Components
{

    public enum AnimationNames
    {
        [Display(Name = "fade")]
        Fade = 0,

        [Display(Name = "fade-up")]
        FadeUp,

        [Display(Name = "fade-down")]
        FadeDown,

        [Display(Name = "fade-left")]
        FadeLeft,

        [Display(Name = "fade-right")]
        FadeRight,

        [Display(Name = "fade-up-right")]
        FadeUpRight,

        [Display(Name = "fade-up-left")]
        FadeUpLeft,

        [Display(Name = "fade-down-right")]
        FadeDownRight,

        [Display(Name = "fade-down-left")]
        FadeDownLeft,

        [Display(Name = "flip-up")]
        FlipUp,

        [Display(Name = "flip-down")]
        FlipDown,

        [Display(Name = "flip-left")]
        FlipLeft,

        [Display(Name = "flip-right")]
        FlipRight,

        [Display(Name = "slide-up")]
        SlideUp,

        [Display(Name = "slide-down")]
        SlideDown,

        [Display(Name = "slide-left")]
        SlideLeft,

        [Display(Name = "slide-right")]
        SlideRight,

        [Display(Name = "zoom-in")]
        ZoomIn,

        [Display(Name = "zoom-in-up")]
        ZoomInUp,

        [Display(Name = "zoom-in-down")]
        ZoomInDown,

        [Display(Name = "zoom-in-left")]
        ZoomInLeft,

        [Display(Name = "zoom-in-right")]
        ZoomInRight,

        [Display(Name = "zoom-out")]
        ZoomOut

    }

}


You can clone the Blazor Animation sample easily from Github by following Git command:

git clone https://github.com/toreaurstadboss/BlazorAnimateSample.git

Saturday 22 April 2023

Tag Helpers in Asp.net Core Mvc 7

This article will present a sample Tag Helper in .net. A Tag Helper is similar to Html Helpers in Asp.net Mvc in .NET Framework, but it is easier to use in HTML as it does not use the special "@-syntax". The Tag helper will render a list using the <ul> and <li> tags. In addition, Bootstrap 5 will be used. Start by creating a razor application with this command:
dotnet new razor -o TagHelpers Then move into the folder TagHelpers and type: code .

Inside Visual Studio Code, hit Ctrl+P and look up the file _ViewImports.cshtml and add the current assembly/solution using:

@addTagHelper *, TagHelpers

This tells that we want to add any TagHelper from the assembly called TagHelpers (the solution we are working with).

@using TagHelpers
@namespace TagHelpers.Pages
@addTagHelper *, Microsoft.AspNetCore.Mvc.TagHelpers
@addTagHelper *, TagHelpers

Consider the following HTML :

<list separator="|">option 1| option 2| option 3| option 4| option 5| option 6| option 7| option 8|this is fun<list>
We want to turn that HTML into the list shown in screen shot below :
That is - create a list using an <ul> tag followed by <li> tags inside. Since we need to access the inner content of the HTML here, we have to use ProcessAsync method of derived method from the TagHelper. We create a TagHelper by inheriting from this class and we also have to name the class suffixed by TagHelper by convention. The resulting Tag Helper then looks like this:


using System.Text;
using Microsoft.AspNetCore.Razor.TagHelpers;

namespace TagHelpers.TagHelpers;

public class ListTagHelper : TagHelper {

    public override async Task ProcessAsync(TagHelperContext context, TagHelperOutput output)
    {
        output.TagName = "ul";
        output.Attributes.Add("class", "list-group");
        output.Attributes.Add("style", "display:inline-block"); 
        var existingContent = await output.GetChildContentAsync(); 
        var allContent = existingContent.GetContent();
        var items = allContent.Trim().Split(new[] { Separator }, StringSplitOptions.None);
        var outputHtml = new StringBuilder();
        foreach (var item in items){
            outputHtml.Append($@"<li class=""list-group-item"">{item}</li>");
        }
        output.Content.SetHtmlContent(outputHtml.ToString());        
    }
    public string Separator { get; set; } = ",";
}


We default set the property Separator default to "," to separate items in our list. We could use another separator, such as "|" shown in the markup. If you omit the Separator, "," will be default used. Each public property becomes a recognized attribute in your TagHelper and can be used in the HTML. The TagName is the tag that will be used in the HTML. As we see, we also add 'class' and 'style' attributes here to show a list-group in HTML using Bootstrap 5 classes. We also split the items using the separator, make not that we use the GetChildContentAsync() method on the TagHelperOutput output object, followed by GetContent() method call. Also note that we have to use SetHtmlContent method in case we want to add explicit html content in the content of our 'a' tag here. It is suggested that you stick to string properties in Razor tag helpers instead of other data types.