Showing posts with label Azure AI. Show all posts

Saturday, 22 March 2025

Image classification using ML.NET Machine Learning

I added a demo using ML.Net in a Github. The demo is available in this repository :

https://github.com/toreaurstadboss/ImageClassificationMLNetBlazorDemo

A screenshot shows the application running below :

ML.Net is Microsoft's machine learning library. It is combined with tooling inside VS 2022 an easy way to locally use machine learning models on your CPU or GPU, or hosted in Azure cloud services. The website for ML.Net is available here for more information about ML.Net and documentation:

https://dotnet.microsoft.com/en-us/apps/ai/ml-dotnet

In the demo above I have trained the model to recognize either horses or mooses. These species are both mammals and herbivores and somewhat are similar in appearance. I have trained the machine learning model in this demo only with ten images of each category, then again with ten other test images that checks if the model recognizes correctly if we see a horse or a moose. Already with just ten images, it did not miss once, and of course a better example for a real world machine learning model would have scoured over tens of thousand of images to handle all edge cases. ML.Net is very easy to run, it can be run locally on your own machine, using the CPU or GPU. The GPU must be CUDA compatible. That actually means you need a NVIDIA card with 8-series. I got such a card on a laptop of mine and have tested it. The following links points to download pages of NVIDIA for downloading the necessary software as of March 2025 to run ML.Net image classification functionality on GPUs :

Download Cuda 10.1

Cuda 10.1 can be downloaded from here: https://developer.nvidia.com/cuda-10.1-download-archive-base

CuDnn 7.6.4

CuDnn can be downloaded from here: https://developer.nvidia.com/rdp/cudnn-archive

Getting started with image classification using ML.Net

It is easiest to use VS 2022 to add a ML.Net machine learning model. Inside VS 2022, right click your project and choose Add and choose Machine Learning Model In case you do not see this option, hit the start menu and type in Visual Studio installer Now, hit the button Modify for your VS installation. Choose Individual Components Search for 'ml'. Select the ML.NET Model Builder. There are also a package called ML.NET Model Builder 2022, I also chose that.
Choosing the scenario
Now, after adding the Machine Learning model, the first page asks for a scenario. I choose Image Classification here, below Computer Vision scenario category.

Choosing the environment
Then I hit the button Local. In the next step, I select Local (CPU). Note that I have tested also Nvidia Cuda-compatible graphics card / GPU on another laptop and it also worked great and should be preferred if you have a GPU compatible and have installed Cuda 10.1 and Cdnn 7.6.4 as shown in links above.

Hit the button Next Step.
Choosing the Data
It is time to train the machine learning model with data ! I have gathered ten sample images of mooses and horses each. By pointing to a folder with images where each category of images are gathered in subfolders of this folder.

Next step is Train
Training the model
Here you can hit the button Train again. When you have trained enough here the model, you can hit the button Next step . Training the machine learning will take some time depending on you using CPU or GPU and the number of input images here. Usually it takes a few seconds, but not many minutes to churn through a couple of images as shown here, 20 images in total.

Loading up the image data and using the machine learning model

Note that ML.Net demands support to renderinteractive rendering of web apps, pure Blazor WASM apps are not supported. The following file shows how the Blazor serverside app is set up.

Program.cs

using ImageClassificationMLNetBlazorDemo.Components;

var builder = WebApplication.CreateBuilder(args);

// Add services to the container.
builder.Services.AddRazorComponents()
    .AddInteractiveServerComponents();

var app = builder.Build();

// Configure the HTTP request pipeline.
if (!app.Environment.IsDevelopment())
{
    app.UseExceptionHandler("/Error", createScopeForErrors: true);
    // The default HSTS value is 30 days. You may want to change this for production scenarios, see https://aka.ms/aspnetcore-hsts.
    app.UseHsts();
}

app.UseHttpsRedirection();

app.UseStaticFiles();
app.UseAntiforgery();

app.MapRazorComponents<App>()
    .AddInteractiveServerRenderMode();

app.Run();


InteractiveServer is set up inside the App.razor using the HeadOutlet.

App.razor


<!DOCTYPE html>
<html lang="en">

<head>
    <meta charset="utf-8" />
    <meta name="viewport" content="width=device-width, initial-scale=1.0" />
    <base href="/" />
    <link rel="stylesheet" href="app.css" />
    <link rel="stylesheet" href="lib/bootstrap/css/bootstrap.min.css" />
    <link rel="stylesheet" href="ImageClassificationMLNetBlazorDemo.styles.css" />
    <link rel="icon" type="image/png" href="favicon.png" />

    <HeadOutlet @rendermode="InteractiveServer" />
</head>

<body>
    <Routes @rendermode="InteractiveServer" />
    <script src="_framework/blazor.web.js"></script>
</body>

</html>


The following codebehind of the razor component Home.razor in the demo repo shows how a file uploaded using the InputFile control in Blazor serverside. Home.razor.cs


@code {

    private string? _base64ImageSource = null;
    private string? _predictedLabel = "No classification";
    private IOrderedEnumerable<KeyValuePair<string, float>>? _predictedLabels = null;
    private int? _assessedPredictionQuality = null;
    private string? _errorMessage = null;

    private async Task LoadFileAsync(InputFileChangeEventArgs e)
    {
        try
        {
            ResetPrivateFields();

            if (e.File.Size <= 0 || e.File.Size >= 2 * 1024 * 1024)
            {
                _errorMessage = "Sorry, the uploaded image but be between 1 byte and 2 MB!";
                return;
            }

            byte[] imageBytes = await GetImageBytes(e.File);
            _base64ImageSource = GetBase64ImageSourceString(e.File.ContentType, imageBytes);

            PredictImageClassification(imageBytes);

        }
        catch (Exception err)
        {
            Console.WriteLine(err);
        }
    }

    private void ResetPrivateFields()
    {
        _base64ImageSource = null;
        _predictedLabel = null;
        _predictedLabels = null;
        _assessedPredictionQuality = null;
    }

    private int GetAssesPrediction()
    {
        int result = 1;
        if (_predictedLabel != null && _predictedLabels != null)
        {
            foreach (var label in _predictedLabels)
            {
                if (label.Key == _predictedLabel)
                {
                    result = label.Value switch
                    {
                        <= 0.50f => 1,
                        <= 0.70f => 2,
                        <= 0.80f => 3,
                        <= 0.85f => 4,
                        <= 0.90f => 5,
                        <= 1.0f => 6,
                        _ => 1 //default to dice we get some other score here..
                    };
                }
            }
        }

        return result;
    }

    private void PredictImageClassification(byte[] imageBytes)
    {

        var input = new ModelInput
            {
                ImageSource = imageBytes
            };
        ModelOutput output = HorseOrMooseImageClassifier.Predict(input);
        _predictedLabel = output.PredictedLabel;

        _predictedLabels = HorseOrMooseImageClassifier.PredictAllLabels(input);

        _assessedPredictionQuality = GetAssesPrediction(); //check how good the prediction is, give a score from 1-6 (dice score!)

        StateHasChanged();
    }


    private async Task<byte[]> GetImageBytes(IBrowserFile file) 
    {
        using MemoryStream memoryStream = new();
        var stream = file.OpenReadStream(2 * 1024 * 1024, CancellationToken.None);
        await stream.CopyToAsync(memoryStream);
        return memoryStream.ToArray();
    }

    private string GetBase64ImageSourceString(string contentType, byte[] bytes)
    {
        string preAmble = $"data:{contentType};base64,";
        return $"{preAmble}{(Convert.ToBase64String(bytes))}";
    }
}


As the code shows above, using the machine learning model is quite convenient, we just use the methods Predict to get the Label that is decided exists in the loaded image. This is the image classiciation that the machine learning found. Note that using the method PredictAllLabels get the confidence of the different labels show in this demo. There are no limitations on the number of categories here in the image classification labels that one could train a model to look after. A benefit with ML.Net is the option to use it on-premise servers and get fairly good result on just a few sample images. But the more sample images you obtain for a label, the more precise the machine learning model will become. It is possible to download a pre-trained model such as Inceptionv3 that is compatible with Tensorflow used here that supports up to 1000 categories. More information is available here from Microsoft about using a pre-trained model such as InceptionV3:

https://learn.microsoft.com/en-us/dotnet/machine-learning/tutorials/image-classification

Sunday, 16 February 2025

Outputting tags/objects using Azure AI

This article presents a way to output tags for an image and output it to the console. Azure AI is used, more specifically the ImageAnalysisClient. The article shows how you can define a way to consume the data for an IAsyncEnumerable, so you can use await foreach to consume the data. I would recommend this approach for many services in Azure Ai (and similar) where there is no support out of the box for async enumerable and hide away the deails in a helper extension method as shown in this article.


  public static async void ExtractImageTags()
  {
      string visionApiKey = Environment.GetEnvironmentVariable("VISION_KEY")!;
      string visionApiEndpoint = Environment.GetEnvironmentVariable("VISION_ENDPOINT")!;

      var credentials = new AzureKeyCredential(visionApiKey);
      var serviceUri = new Uri(visionApiEndpoint);

      var imageAnalysisClient = new ImageAnalysisClient(serviceUri, credentials);
      await foreach (var tag in imageAnalysisClient.ExtractImageTagsAsync("Images/Store.png"))
      {
          Console.WriteLine(tag);
      }           
  }
  

The code creates an ImageAnalysisClient, defined in the Azure.AI.Vision.ImageAnalysis Nuget package. I got two environment variables here to store the key and endpoint. Note that not all Azure Ai features are available in all regions. If you just want to test out some Azure Ai features, you can first off just test it out at US East region, as that region will have most likely all features you want to test, then you can just a more local region if you are planning to do more workloads using Azure Ai.

Then we use an await foreach pattern here to extract the image tags asynchronously. This is a custom extension method I created so I can output the tags asynchronously using await foreach and also specify a wait time between each new tag being outputted, defaulting to 200 milliseconds here.

The extension method looks like this:


using Azure.AI.Vision.ImageAnalysis;

namespace UseAzureAIServicesFromNET.Vision;

public static class ImageAnalysisClientExtensions
{

    /// <summary>
    /// Extracts the tags for image at specified path, if existing.
    /// The results are returned as async enumerable of strings. 
    /// </summary>
    /// <param name="client"></param>
    /// <param name="imagePath"></param>
    /// <param name="waitTimeInMsBetweenOutputTags">Default wait time in ms between output. Defaults to 200 ms.</param>
    /// <returns></returns>
    public static async IAsyncEnumerable<string?> ExtractImageTagsAsync(this ImageAnalysisClient client, 
    	string imagePath, int waitTimeInMsBetweenOutputTags = 200)
    {
        if (!File.Exists(imagePath))
        {
            yield return default(string); //just return null if a file is not found at provided path
        }
        using FileStream imageStream = new FileStream(imagePath, FileMode.Open);
        var analysisResult = 
        	await client.AnalyzeAsync(BinaryData.FromStream(imageStream), VisualFeatures.Tags | VisualFeatures.Caption);
        yield return $"Description: {analysisResult.Value.Caption.Text}";
        foreach (var tag in analysisResult.Value.Tags.Values)
        {
            yield return $"Tag: {tag.Name}, Confidence: {tag.Confidence:F2}";        
            await Task.Delay(waitTimeInMsBetweenOutputTags);
        }
    }

}


The console output of the tags looks like this:

In addition to tags, we can also output objects in the image in a very similar extension method:


/// <summary>
/// Extracts the objects for image at specified path, if existing.
/// The results are returned as async enumerable of strings. 
/// </summary>
/// <param name="client"></param>
/// <param name="imagePath"></param>
/// <param name="waitTimeInMsBetweenOutputTags">Default wait time in ms between output. Defaults to 200 ms.</param>
/// <returns></returns>
public static async IAsyncEnumerable<string?> ExtractImageObjectsAsync(this ImageAnalysisClient client,
string imagePath, int waitTimeInMsBetweenOutputTags = 200)
{
    if (!File.Exists(imagePath))
    {
        yield return default(string); //just return null if a file is not found at provided path
    }
    using FileStream imageStream = new FileStream(imagePath, FileMode.Open);
    var analysisResult =
    	await client.AnalyzeAsync(BinaryData.FromStream(imageStream), VisualFeatures.Objects | VisualFeatures.Caption);
    yield return $"Description: {analysisResult.Value.Caption.Text}";
    foreach (var objectInImage in analysisResult.Value.Objects.Values)
    {
            yield return $"""
Object tag: {objectInImage.Tags.FirstOrDefault()?.Name} Confidence: {objectInImage.Tags.FirstOrDefault()?.Confidence}, 
Position (bbox): {objectInImage.BoundingBox}
""";
        await Task.Delay(waitTimeInMsBetweenOutputTags);
    }
}           
             

The code is nearly identical, we set the VisualFeatures of the image to extract and we read out the objects (not the tags). The console output of the objects looks like this:

Monday, 16 December 2024

SpeechService in Azure AI Text to Speech

This article will present Azure AI Text To Speech service. The code for this article is available to clone from Github repo here:

https://github.com/toreaurstadboss/SpeechSynthesis.git

The speech service uses AI trained speech to provide natural speech and ease of use. You can just provide text and get it read out aloud. An overview of supported languages in the Speech service is shown here:

https://learn.microsoft.com/en-us/azure/ai-services/speech-service/language-support?tabs=stt

Azure AI Speech Synthesis DEMO

You can create a TTS - Text To Speech service using Azure AI service for this. This Speech service in this demo uses the library Nuget Microsoft.CognitiveServices.Speech.

This repo contains a simple demo using Azure AI Speech synthesis using Azure.CognitiveServices.SpeechSynthesis.
It provides a simple way of synthesizing text to speech using Azure AI services. Its usage is shown here:

The code provides a simple builder for creating a SpeechSynthesizer instance.

using Microsoft.CognitiveServices.Speech;

namespace ToreAurstadIT.AzureAIDemo.SpeechSynthesis;

public class Program
{
    private static async Task Main(string[] args)
    {
        Console.WriteLine("Your text to speech input");
        string? text = Console.ReadLine();

        using (var synthesizer = SpeechSynthesizerBuilder.Instance.WithSubscription().Build())
        {
            using (var result = await synthesizer.SpeakTextAsync(text))
            {
                string reasonResult = result.Reason switch
                {
                    ResultReason.SynthesizingAudioCompleted => $"The following text succeeded successfully: {text}",
                    _ => $"Result of speeech synthesis: {result.Reason}"
                };
                Console.WriteLine(reasonResult);
            }
        }

    }

}

The builder looks like this:
using Microsoft.CognitiveServices.Speech;

namespace ToreAurstadIT.AzureAIDemo.SpeechSynthesis;

public class SpeechSynthesizerBuilder
{

    private string? _subscriptionKey = null;
    private string? _subscriptionRegion = null;

    public static SpeechSynthesizerBuilder Instance => new SpeechSynthesizerBuilder();

    public SpeechSynthesizerBuilder WithSubscription(string? subscriptionKey = null, string? region = null)
    {
        _subscriptionKey = subscriptionKey ?? Environment.GetEnvironmentVariable("AZURE_AI_SERVICES_SPEECH_KEY", EnvironmentVariableTarget.User);
        _subscriptionRegion = region ?? Environment.GetEnvironmentVariable("AZURE_AI_SERVICES_SPEECH_REGION", EnvironmentVariableTarget.User);
        return this;
    }

    public SpeechSynthesizer Build()
    {
        var config = SpeechConfig.FromSubscription(_subscriptionKey, _subscriptionRegion);
        var speechSynthesizer = new SpeechSynthesizer(config);
        return speechSynthesizer;
    }
}

Note that I observed that the audio could get chopped off in the very end. It might be a temporary issue, but if you encounter it too, you can add an initial pause to avoid this:

   string? intialPause = "     ....     "; //this is added to avoid the text being cut in the start

Sunday, 8 December 2024

Extending Azure AI Search with data sources

This article will present both code and tips around getting Azure AI Search to utilize additional data sources. The article builds upon the previous article in the blog:

https://toreaurstad.blogspot.com/2024/12/azure-ai-openai-chat-gpt-4-client.html

This code will use Open AI Chat GPT-4 together with additional data source. I have tested this using Storage account in Azure which contains blobs with documents. First off, create Azure AI services if you do not have this yet.


Then create an Azure AI Search


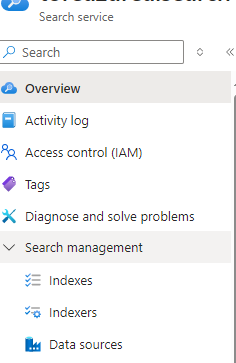
Choose the location and the Pricing Tier. You can choose the Free (F) pricing tier to test out the Azure AI Search. The standard pricing tier comes in at about 250 USD per month, so a word of caution here as billing might incur if you do not choose the Free tier. Head over to the Azure AI Search service after it is crated and note inside the Overview the Url. Expand the Search management and choose the folowing menu options and fill out them in this order:
  • Data sources
  • Indexes
  • Indexers


There are several types of data sources you can add.
  • Azure Blog Storage
  • Azure Data Lake Storage Gen2
  • Azure Cosmos DB
  • Azure SQL Database
  • Azure Table Storage
  • Fabric OneLake files

Upload files to the blob container

  • I have tested out adding a data source using Azure Blob Storage. I had to create a new storage account and I believe Azure might have changed it over the years, so for best compability, add a brand new storage account. Then choose a blob container inside the Blob storage, then hit the Create button.
  • Head over to your Storage browser inside your storage account, then choose Blob container. You can add a Blob container and then after it is created, click the Upload button.
  • You can then upload multiple files into the blob container (it is like a folder, which saves your files as blobs).

Setting up the index

  • After the Blob storage (storage account) is added to the data source, choose the Indexes menu button inside Azure AI search. Click Add index.
  • After the index is added, choose the button Add field
  • Add a field name called : Edit.String of type Edm.String.
  • Click the checkbox for Retrievable and Searchable. Click the button Save

Setting up the indexer

  • Choose to add an Indexer via button Add indexer
  • Choose the Index you added
  • Choose the Data source you added
  • Select the indexed extensions and specify which file types to index. Probably you should select text based files here, such as .md and .markdown files and even some binary file type such as .pdf and .docx can be selected here
  • Data to extract: Choose Content and metadata


Source code for this article

The source code can be cloned from this Github repo:
br /> https://github.com/toreaurstadboss/OpenAIDemo.git

The code for this article is available in the branch:
feature/openai-search-documentsources To add the data source to our ChatClient instance, we do the following. Please note that this method will be changed in the Azure AI SDK in the future :


            ChatCompletionOptions? chatCompletionOptions = null;
            if (dataSources?.Any() == true)
            {
                chatCompletionOptions = new ChatCompletionOptions();

                foreach (var dataSource in dataSources!)
                {
#pragma warning disable AOAI001 // Type is for evaluation purposes only and is subject to change or removal in future updates. Suppress this diagnostic to proceed.
                    chatCompletionOptions.AddDataSource(new AzureSearchChatDataSource()
                    {
                        Endpoint = new Uri(dataSource.endpoint),
                        IndexName = dataSource.indexname,
                        Authentication = DataSourceAuthentication.FromApiKey(dataSource.authentication)
                    });
#pragma warning restore AOAI001 // Type is for evaluation purposes only and is subject to change or removal in future updates. Suppress this diagnostic to proceed.
                }

            }


The updated version of the extension class of OpenAI.Chat.ChatClient then looks like this: ChatClientExtensions.cs


using Azure.AI.OpenAI.Chat;
using OpenAI.Chat;
using System.ClientModel;
using System.Text;

namespace ToreAurstadIT.OpenAIDemo
{
    public static class ChatclientExtensions
    {

        /// <summary>
        /// Provides a stream result from the Chatclient service using AzureAI services.
        /// </summary>
        /// <param name="chatClient">ChatClient instance</param>
        /// <param name="message">The message to send and communicate to the ai-model</param>
        /// <returns>Streamed chat reply / result. Consume using 'await foreach'</returns>
        public static AsyncCollectionResult<StreamingChatCompletionUpdate> GetStreamedReplyAsync(this ChatClient chatClient, string message,
            (string endpoint, string indexname, string authentication)[]? dataSources = null)
        {
            ChatCompletionOptions? chatCompletionOptions = null;
            if (dataSources?.Any() == true)
            {
                chatCompletionOptions = new ChatCompletionOptions();

                foreach (var dataSource in dataSources!)
                {
#pragma warning disable AOAI001 // Type is for evaluation purposes only and is subject to change or removal in future updates. Suppress this diagnostic to proceed.
                    chatCompletionOptions.AddDataSource(new AzureSearchChatDataSource()
                    {
                        Endpoint = new Uri(dataSource.endpoint),
                        IndexName = dataSource.indexname,
                        Authentication = DataSourceAuthentication.FromApiKey(dataSource.authentication)
                    });
#pragma warning restore AOAI001 // Type is for evaluation purposes only and is subject to change or removal in future updates. Suppress this diagnostic to proceed.
                }

            }

            return chatClient.CompleteChatStreamingAsync(
                [new SystemChatMessage("You are an helpful, wonderful AI assistant"), new UserChatMessage(message)], chatCompletionOptions);
        }

        public static async Task<string> GetStreamedReplyStringAsync(this ChatClient chatClient, string message, (string endpoint, string indexname, string authentication)[]? dataSources = null, bool outputToConsole = false)
        {
            var sb = new StringBuilder();
            await foreach (var update in GetStreamedReplyAsync(chatClient, message, dataSources))
            {
                foreach (var textReply in update.ContentUpdate.Select(cu => cu.Text))
                {
                    sb.Append(textReply);
                    if (outputToConsole)
                    {
                        Console.Write(textReply);
                    }
                }
            }
            return sb.ToString();
        }

    }
}


The updated code for the demo app then looks like this, I chose to just use tuples here for the endpoint, index name and api key:

ChatpGptDemo.cs


using OpenAI.Chat;
using OpenAIDemo;
using System.Diagnostics;

namespace ToreAurstadIT.OpenAIDemo
{
    public class ChatGptDemo
    {

        public async Task<string?> RunChatGptQuery(ChatClient? chatClient, string msg)
        {
            if (chatClient == null)
            {
                Console.WriteLine("Sorry, the demo failed. The chatClient did not initialize propertly.");
                return null;
            }

            Console.WriteLine("Searching ... Please wait..");

            var stopWatch = Stopwatch.StartNew();

            var chatDataSources = new[]{
                (
                    SearchEndPoint: Environment.GetEnvironmentVariable("AZURE_SEARCH_AI_ENDPOINT", EnvironmentVariableTarget.User) ?? "N/A",
                    SearchIndexName: Environment.GetEnvironmentVariable("AZURE_SEARCH_AI_INDEXNAME", EnvironmentVariableTarget.User) ?? "N/A",
                    SearchApiKey: Environment.GetEnvironmentVariable("AZURE_SEARCH_AI_APIKEY", EnvironmentVariableTarget.User) ?? "N/A"
                )
            };

            string reply = "";

            try
            {

                reply = await chatClient.GetStreamedReplyStringAsync(msg, dataSources: chatDataSources, outputToConsole: true);
            }
            catch (Exception ex)
            {
                Console.WriteLine(ex.Message);
            }

            Console.WriteLine($"The operation took: {stopWatch.ElapsedMilliseconds} ms");


            Console.WriteLine();

            return reply;
        }

    }
}


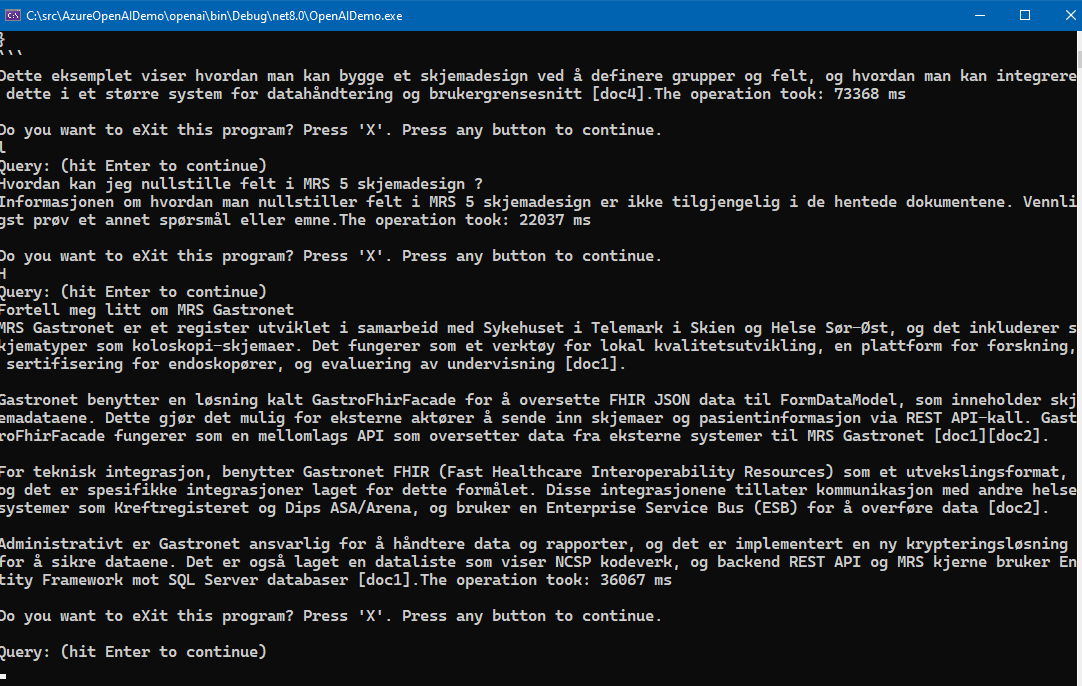
The code here expects that three user-specific environment variables exists. Please note that the API key can be found under the menu item Keys in Azure AI Search. There are two admin keys and multiple query keys. To distribute keys to other users, you of course share the API query key, not the admin key(s). The screenshot below shows the demo. It is a console application, it could be web application or other client : Please note that the Free tier of Azure AI Search is rather slow and seems to only allow queryes at a certain interval, it will suffice to just test it out. To really test it out in for example an Intranet scenario, the standard tier Azure AI search service is recommended, at about 250 USD per month as noted.

Conclusions

Getting an Azure AI Chat service to work in intranet scenarios using a combination of Open AI Chat GPT-4 together with a custom collection of files that are indexed offers a nice combination of building up a knowledge base which you can query against. It is rather convenient way of building an on-premise solution for intranet AI chat service using Azure cloud services.

Monday, 2 December 2024

Azure AI OpenAI chat GPT-4 client connection

This article presents code that shows how you can connect to OpenAI Chat GPT-4 client connection. The repository for the code presented is the following GitHub repo:

https://github.com/toreaurstadboss/OpenAIDemo

The repo contains useful helper methods to use Azure AI Service and create AzureOpenAIClient or the more generic ChatClient which is a specified chat client for the AzureOpenAIClient that uses a specific ai model, default ai model to use is 'gpt-4'. The creation of chat client is done using a class with a builder pattern. To create a chat client you can simply create it like this :

Program.cs

         const string modelName = "gpt-4";

            var chatClient = AzureOpenAIClientBuilder
                .Instance
                .WithDefaultEndpointFromEnvironmentVariable()
                .WithDefaultKeyFromEnvironmentVariable()
                .BuildChatClient(aiModel: modelName);
                

The builder looks like this:

AzureOpenAIClientBuilder.cs


using Azure.AI.OpenAI;
using OpenAI.Chat;
using System.ClientModel;

namespace ToreAurstadIT.OpenAIDemo
{

    /// <summary>
    /// Creates AzureOpenAIClient or ChatClient (default model is "gpt-4")
    /// Suggestion:
    /// Create user-specific Environment variables for : AZURE_AI_SERVICES_KEY and AZURE_AI_SERVICES_ENDPOINT to avoid exposing endpoint and key in source code.
    /// Then us the 'WithDefault' methods to use the two user-specific environment variables, which must be set.
    /// </summary>
    public class AzureOpenAIClientBuilder
    {

        private const string AZURE_AI_SERVICES_KEY = nameof(AZURE_AI_SERVICES_KEY);
        private const string AZURE_AI_SERVICES_ENDPOINT = nameof(AZURE_AI_SERVICES_ENDPOINT);

        private string? _endpoint = null;
        private ApiKeyCredential? _key = null;

        public AzureOpenAIClientBuilder WithEndpoint(string endpoint) { _endpoint = endpoint; return this; }

        /// <summary>
        /// Usage: Provide user-specific enviornment variable called : 'AZURE_AI_SERVICES_ENDPOINT'
        /// </summary>
        /// <returns></returns>
        public AzureOpenAIClientBuilder WithDefaultEndpointFromEnvironmentVariable() { _endpoint = Environment.GetEnvironmentVariable(AZURE_AI_SERVICES_ENDPOINT, EnvironmentVariableTarget.User); return this; }
       
        
        public AzureOpenAIClientBuilder WithKey(string key) { _key = new ApiKeyCredential(key); return this; }       
        public AzureOpenAIClientBuilder WithKeyFromEnvironmentVariable(string key) { _key = new ApiKeyCredential(Environment.GetEnvironmentVariable(key) ?? "N/A"); return this; }

        /// <summary>
        /// Usage : Provide user-specific environment variable called : 'AZURE_AI_SERVICES_KEY'
        /// </summary>
        /// <returns></returns>
        public AzureOpenAIClientBuilder WithDefaultKeyFromEnvironmentVariable() { _key = new ApiKeyCredential(Environment.GetEnvironmentVariable(AZURE_AI_SERVICES_KEY, EnvironmentVariableTarget.User) ?? "N/A"); return this; }

        public AzureOpenAIClient? Build() => !string.IsNullOrWhiteSpace(_endpoint) && _key != null ? new AzureOpenAIClient(new Uri(_endpoint), _key) : null;

        /// <summary>
        /// Default model will be set 'gpt-4'
        /// </summary>
        /// <returns></returns>
        public ChatClient? BuildChatClient(string aiModel = "gpt-4") => Build()?.GetChatClient(aiModel);

        public static AzureOpenAIClientBuilder Instance => new AzureOpenAIClientBuilder();

    }
}


It is highly recommended to store your endpoint and key to the Azure AI service of course not in the source code repository, but another place, for example on your user-specific environment variable or Azure key vault or similar place hard to obtain for malicious use, for example using your account to route much traffic to Chat GPT-4 only to end up being billed for this traffic. The code provided some 'default methods' which will look for environment variables. Add the key and endpoint to your Azure AI to these user specific environment variables.
  • AZURE_AI_SERVICES_KEY
  • AZURE_AI_SERVICES_ENDPOINT

To use the chat client the following code shows how to do this:

ChatGptDemo.cs


    public async Task<string?> RunChatGptQuery(ChatClient? chatClient, string msg)
        {
            if (chatClient == null)
            {
                Console.WriteLine("Sorry, the demo failed. The chatClient did not initialize propertly.");
                return null;
            }

            var stopWatch = Stopwatch.StartNew();

            string reply = await chatClient.GetStreamedReplyStringAsync(msg, outputToConsole: true);

            Console.WriteLine($"The operation took: {stopWatch.ElapsedMilliseconds} ms");


            Console.WriteLine();

            return reply;
        }
        
        
The communication against Azure AI service with Open AI Chat-GPT service is this line:

ChatGptDemo.cs


    string reply = await chatClient.GetStreamedReplyStringAsync(msg, outputToConsole: true);

The Chat GPT-4 service will return the data streamed so you can output the result as quickly as possible. I have tested it out using Standard Service S0 tier, it is a bit slower than the default speed you get inside the browser using Copilot, but it works and if you output to the console, you get a similar experience. The code here can be used in different environments, the repo contains a console app with .NET 8.0 Framework, written in C# as shown in the code. Here is the helper methods for the ChatClient, provided as extension methods.

ChatclientExtensions.cs


using OpenAI.Chat;
using System.ClientModel;
using System.Text;

namespace OpenAIDemo
{
    public static class ChatclientExtensions
    {

        /// <summary>
        /// Provides a stream result from the Chatclient service using AzureAI services.
        /// </summary>
        /// <param name="chatClient">ChatClient instance</param>
        /// <param name="message">The message to send and communicate to the ai-model</param>
        /// <returns>Streamed chat reply / result. Consume using 'await foreach'</returns>
        public static AsyncCollectionResult<StreamingChatCompletionUpdate> GetStreamedReplyAsync(this ChatClient chatClient, string message) =>
            chatClient.CompleteChatStreamingAsync(
                [new SystemChatMessage("You are an helpful, wonderful AI assistant"), new UserChatMessage(message)]);

        public static async Task<string> GetStreamedReplyStringAsync(this ChatClient chatClient, string message, bool outputToConsole = false)
        {
            var sb = new StringBuilder();
            await foreach (var update in GetStreamedReplyAsync(chatClient, message))
            {
                foreach (var textReply in update.ContentUpdate.Select(cu => cu.Text))
                {
                    sb.Append(textReply);
                    if (outputToConsole)
                    {
                        Console.Write(textReply);
                    }
                }
            }
            return sb.ToString();
        }

    }
}


The code presented here should make it a bit easier to communicate with the Azure AI Open AI Chat GPT-4 service. See the repository to test out the code. Screenshot below shows the demo in use in a console running against the Azure AI Chat GPT-4 service :