This article will look at running graphical Linux applications in Windows 10. As many of you know, Windows 10 can offer a subsystem for Linux running inside Windows 10. We need to download and install a X11 server to be able to run graphical applications that need more than the console, that is a graphical user interface. First off, download XMing for Windows Server from here:
XMing X Server for Windows Server
After installation of Xming, start Xming from your start button.
Now we need to install the Linux Subsystem itself, if you have not done this yet.
Inside Powershell, enter the following
command as an administrator:
Enable-WindowsOptionalFeature -Online -FeatureName Microsoft-Windows-Subsystem-Linux
If you are not a Windows Insider yet, you must join this program. See this page for a description how to obtain WSL or Windows Subsystem for Linux
and install it.
Installation guide of WSL - Windows Subsystem for Linux
After you have downloaded WSL and installed it using Powershell, select Launch and in the console Window after WSL is further installed and setup, enter a user in Linux you will use as administrator (in Linux terms, this is the root user). You can add another user using the
adduser command as root in the Bash console. You can access WSL Linux inside Windows 10 by selecting the menu item
Bash on Ubuntu on Windows.
Getting started using WSL
You probably want to update your WSL to the latest version. WSL is a specialized Ubuntu Linux distribiton. Enter the following command to upgrade Linux Kernel and applications, note that it will take time to download package and upgrade to latest versions:
apt-get update && apt-get upgrade
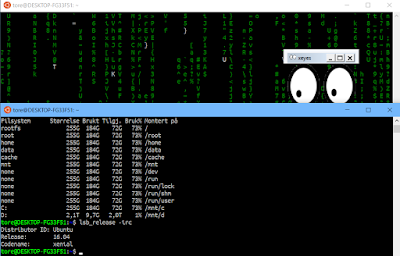
The version of Linux distro can be found using this command:
lsb_release -irc
As we see, I am running Ubuntu 16 Xenial. Next off, we are going to support X-Server. Download first the X11 apps.
root@tore# apt-cache search x11-apps
x11-apps - X applications
Install X11-Apps. This will also download all required additional pacages.
apt-get install X11-Apps
You need to do this as root or switching to a super user and use the sudo command. Next off, edit your ~/.bashrc file. This is similar to the $Profile file that Powershell uses. You are setting up your environment here to make sure you can use X-Server based Graphical User Interfaces. Such as Gimp, Firefox, Stellarium, Quake and so on - requiring a GUI. But we will start off with running a X11-app, such as Xeyes. Make sure your
~/.bashrc file got the following content. First download
Nano if you do not want to use Vim or Vi. (apt-get install nano)
nano ~/.bashrc
Next off, add the following line at least:
export DISPLAY=:0
We can also add more nice colors and some additional information and offer to switch to a non-root user initally.
export DISPLAY=:0
LS_COLORS='rs=0:di=1;35:ln=01;36:mh=00:pi=40;33:so=01;35:do=01;35:bd=40;33;01:cd=40;33;01:or=40;31;01:su=37;41:sg=30;43:ca=30;41:tw=30;42:ow=34;42:st=37;44:ex=01;32:*.tar=01;31:*.tgz=01;31:*.arj=01;31:*.taz=01;31:*.lzh=01;31:*.lzma=01;31:*.tlz=01;31:*.txz=01;31:*.zip=01;31:*.z=01;31:*.Z=01;31:*.dz=01;31:*.gz=01;31:*.lz=01;31:*.xz=01;31:*.bz2=01;31:*.bz=01;31:*.tbz=01;31:*.tbz2=01;31:*.tz=01;31:*.deb=01;31:*.rpm=01;31:*.jar=01;31:*.war=01;31:*.ear=01;31:*.sar=01;31:*.rar=01;31:*.ace=01;31:*.zoo=01;31:*.cpio=01;31:*.7z=01;31:*.rz=01;31:*.jpg=01;35:*.jpeg=01;35:*.gif=01;35:*.bmp=01;35:*.pbm=01;35:*.pgm=01;35:*.ppm=01;35:*.tga=01;35:*.xbm=01;35:*.xpm=01;35:*.tif=01;35:*.tiff=01;35:*.png=01;35:*.svg=01;35:*.svgz=01;35:*.mng=01;35:*.pcx=01;35:*.mov=01;35:*.mpg=01;35:*.mpeg=01;35:*.m2v=01;35:*.mkv=01;35:*.webm=01;35:*.ogm=01;35:*.mp4=01;35:*.m4v=01;35:*.mp4v=01;35:*.vob=01;35:*.qt=01;35:*.nuv=01;35:*.wmv=01;35:*.asf=01;35:*.rm=01;35:*.rmvb=01;35:*.flc=01;35:*.avi=01;35:*.fli=01;35:*.flv=01;35:*.gl=01;35:*.dl=01;35:*.xcf=01;35:*.xwd=01;35:*.yuv=01;35:*.cgm=01;35:*.emf=01;35:*.axv=01;35:*.anx=01;35:*.ogv=01;35:*.ogx=01;35:*.aac=00;36:*.au=00;36:*.flac=00;36:*.mid=00;36:*.midi=00;36:*.mka=00;36:*.mp3=00;36:*.mpc=00;36:*.ogg=00;36:*.ra=00;36:*.wav=00;36:*.axa=00;36:*.oga=00;36:*.spx=00;36:*.xspf=00;36:';
export LS_COLORS
PS1='\e[37;1m\u@\e[35m\W\e[0m\$ '
echo "Welcome to Bash on Ubuntu on Windows. To switch to your user Tore :"
echo "su tore && cd /home/tore"
echo "Do this now? [y/n]"

read -rsn1 input
if [ "$input" = "y" ]; then
    cd /home/tore
    su tore
    ls -al
fi


echo "To adjust profile file edit the file ~\.bashrc with Nano"
Last, we can test out everything, running Xeyes. Note that you can test out more advanced Linux applications such as Gimp by running:
apt-get install gimp
This will install Gimp, the Gnu Image Manipulation Program. Then just enter
gimp from the console. You can also run such programs in the
background by adding the ampersand (&): gimp &
Sometimes, we need to force an exit of such a Linux app with a GUI running from the console entering Ctrl+C to force exit the process.
